
The water level in your toilet bowl may not be the most glamorous topic, but it’s essential to know to avoid any unwanted surprises. Unless you enjoy problems like toilet overflows, clogs, and bad smells, trust us—you’re going to want to get acquainted with the ideal toilet water level.
Imagine this: You finish your business and flush the toilet. But instead of draining correctly, the water level starts rising… and rising… and rising. Suddenly, you’re staring down at a toilet bowl overflow. Talk about a crappy situation!
To prevent this from happening, you need to be aware of the proper water level for your toilet bowl.
Key Points
- An ideal toilet bowl water level should just cover the P-trap outlet.
- A level lower can cause a poor flush, while a higher level can cause overflows and unpleasant smells.
- The typical modern toilet will use 1.6 gallons (or about 6 liters) of water per flush.
- An incorrect toilet tank water level will often cause issues with the toilet bowl water level
- Most toilet bowl water level issues can be addressed with DIY solutions, like adjusting toilet tank components, clearing toilet blockages, removing mineral buildup, and so on.
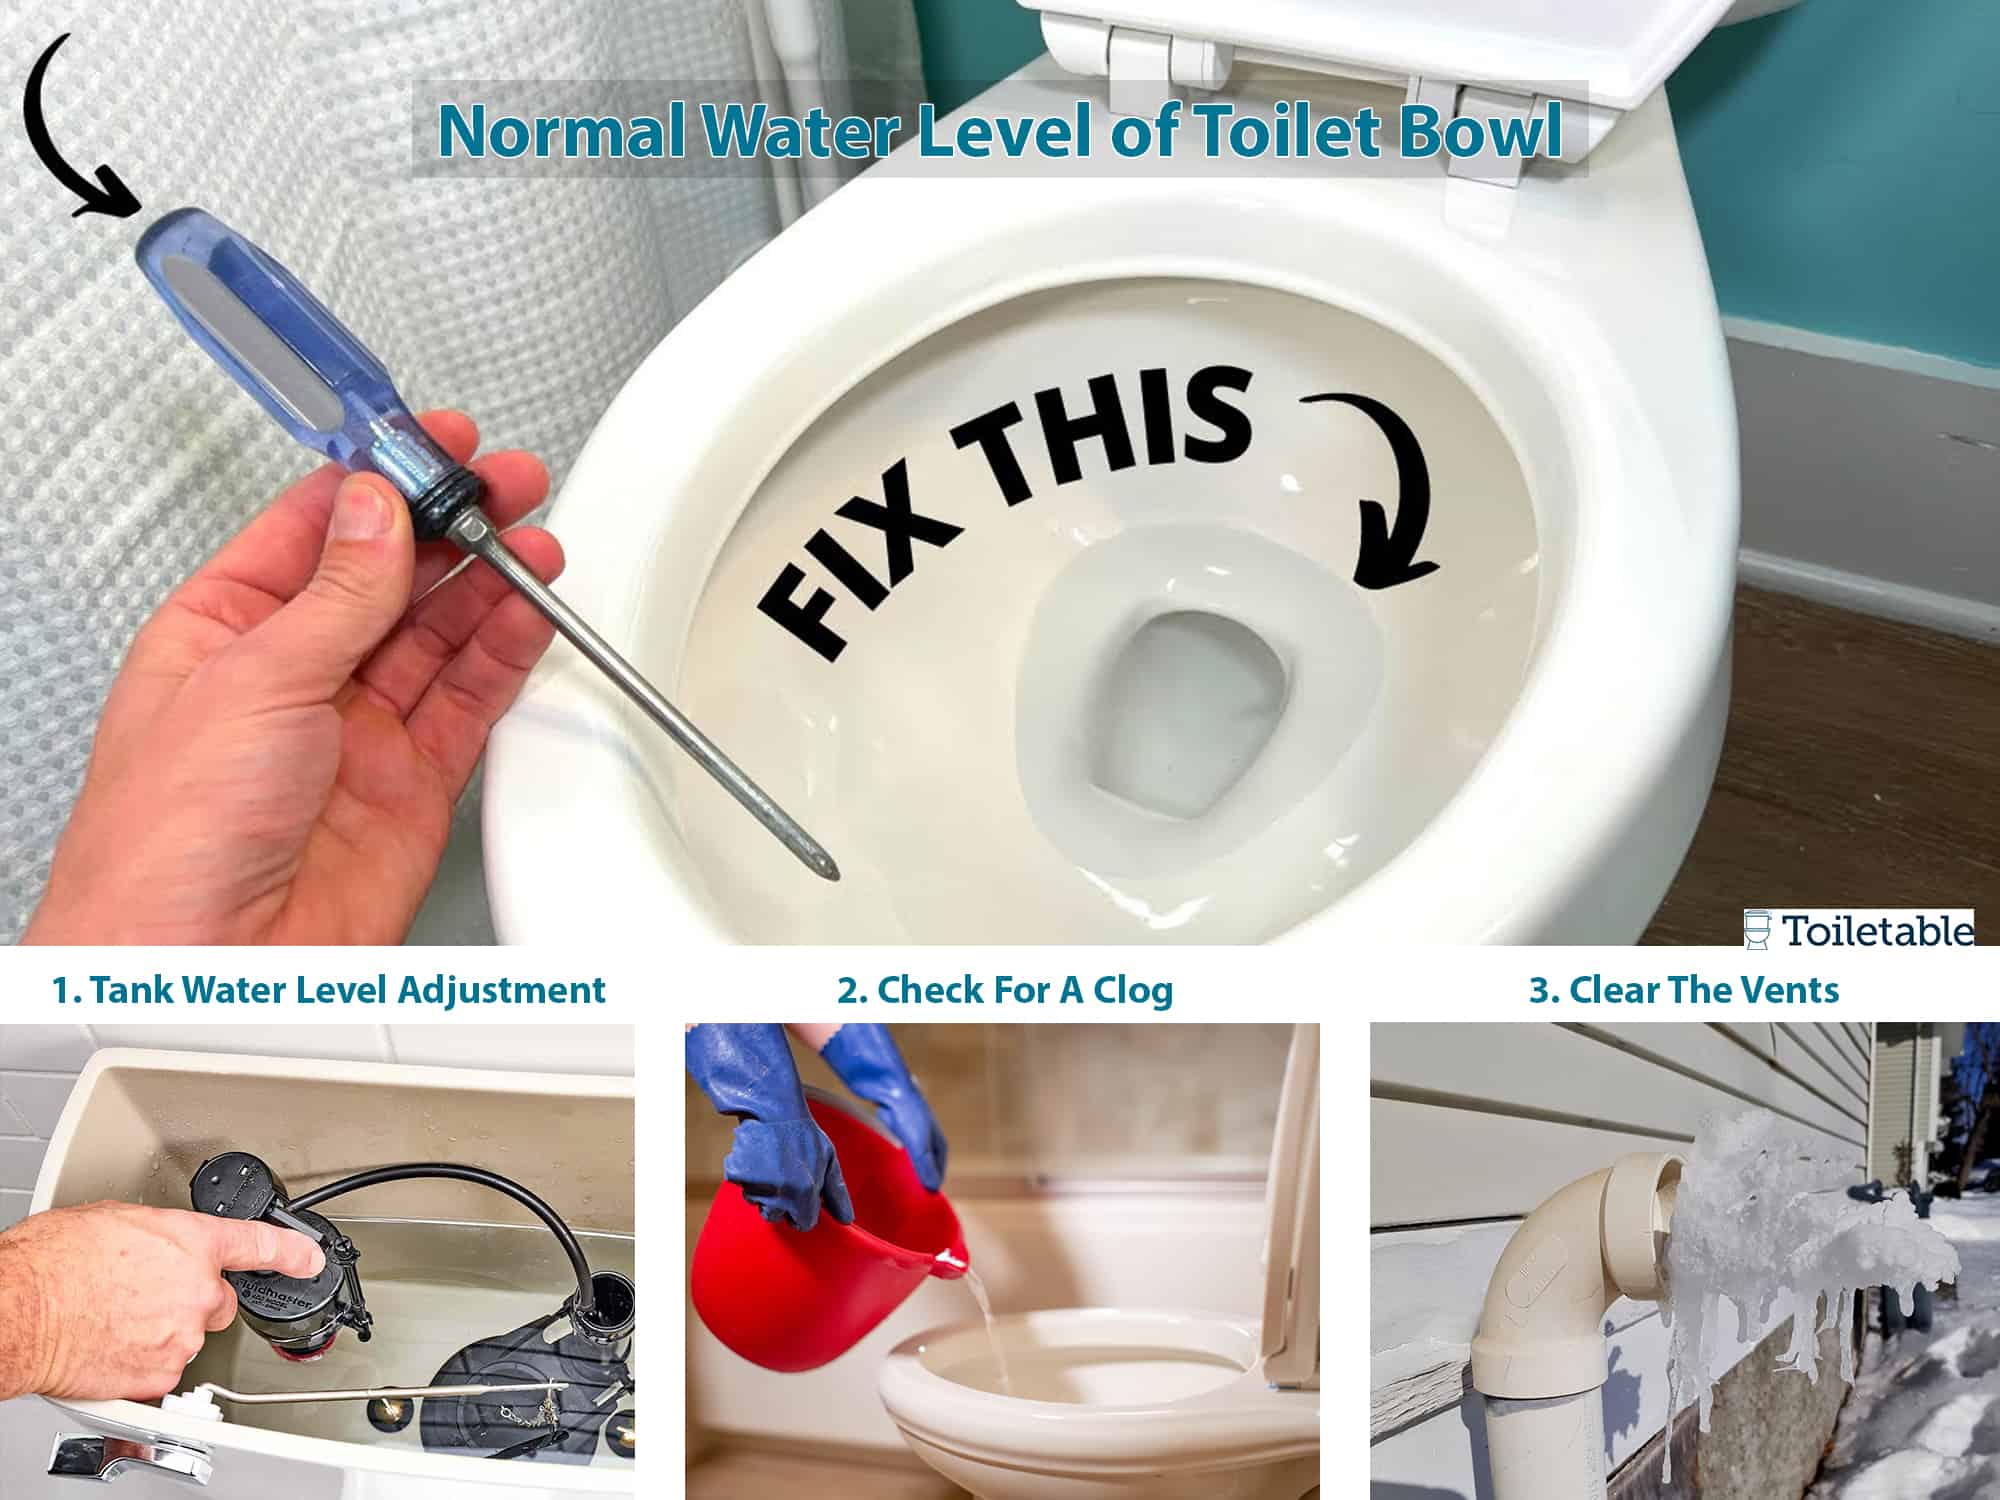
The Perfect Toilet Bowl Water Level
To put it simply, the perfect amount of water in your toilet bowl is just enough for a good flush but not so much that you’re wasting water. Federal standards dictate that a toilet should use no more than 1.6 gallons of water per flush.
How Do I Measure My Toilet Bowl’s Water Level?
Confirming your toilet bowl’s ideal water level is super simple—you typically don’t even need any tools. You can usually just make a visual confirmation that it’s where it needs to be. However, if you’re the precise type, you can certainly take a more detailed measurement.
We’ll give you the scoop on both methods below.
Visual Water Level Confirmation
How to Do It
- STEP 1: Identify the toilet P-trap outlet. This is the drain hole in the bottom of the toilet bowl.
- STEP 2: Flush the toilet and allow the bowl to refill. Let the bowl fill until water stops flowing into it.
- STEP 3: Observe where the water level settles. Generally, the water level should just cover the toilet’s P-trap outlet (or the drain hole). This ensures proper suction for flushing and prevents sewer gases from entering your home.
Detailed Water Level Measurement
While a visual confirmation that the water level covers the toilet’s P-trap is typically more than enough information, there are times when you’d want to take a more detailed measurement.

These include situations where you want to confirm consistency in water levels, diagnose flushing problems, and compare your water level to the manufacturer’s specifications.
Items you’ll need
- Tape measure or ruler
How to Do It
- STEP 1: Locate the bottom of the toilet bowl. This should be the point right before the bowl curves into the drain.
- STEP 2: Measure from the bottom of the bowl to the top of the water level using your tape measure or ruler. A typical water level measurement is around 5 to 7 inches.
Adjusting the Water Level
If you’ve found that your water level is not at the ideal height—meaning it doesn’t just cover the toilet’s P-trap—you’ll want to adjust it. There are many factors that can contribute to a water level that is too high or too low, so read on for how to handle your unique situation.
Remember, shutting off the water supply is always step 1 when making any DIY toilet repairs! Locate the shut-off valve on the wall or floor near the base of the toilet and turn it clockwise. This will stop the flow of water and save you the headache of costly and messy overflows—you can thank us later!
Partners in Crime: Toilet Tank and Toilet Bowl Water Level
Sometimes an improper water level in the toilet bowl is just a symptom of a different problem: an incorrect amount of water in the toilet tank. If your toilet bowl water level is too high or low, checking the water level in the toilet tank is a good place to start. Here’s what to do:
Checking the Toilet Tank Water Level
Items you’ll need
- Ruler (optional)
How to Do It
- STEP 1: Remove the toilet tank lid. Set aside.
- STEP 2: Observe the water level in the toilet tank. Many toilets have a water level mark inside the tank by the overflow tube. This should show you the ideal water level. If your toilet tank doesn’t have a water level mark, take a quick measurement. The water level should be 1 to 2 inches below the top of the overflow tube. You can use a ruler to take a quick measurement if desired.
- STEP 3: If the water in the tank is too low or high, it’s time for some DIY troubleshooting. Read on to find out what to do next.
Increasing the Water Level
If you find that the water level in your toilet bowl is too low, the first thing you need to do is figure out why. The cause could be insufficient water in the toilet tank, a toilet clog, blocked toilet vents, and more.
Insufficient Water in the Toilet Tank
When your toilet tank doesn’t fill properly, a sufficient amount of water won’t be able to flow into the bowl. This can lead to trouble flushing and even make your bathroom smell like sewage—yuck! The water supply valve can be the culprit, as well as a few components within the tank itself, like the float, the refill tube, and the fill valve.

Checking the Water Supply Valve
The water supply valve is located on the wall or floor near the toilet’s base. To function properly, it should be completely open. If it isn’t, turning it fully clockwise will open it and should get things flowing as they should.
Adjusting the Float
A big cause of a too-empty toilet tank is a float that’s too low. Adjusting the float is simple and will depend on whether your toilet has a float ball or a cylinder float (also called a float cup). Just like magic—but with less smoke and mirrors—you may find that this small adjustment quickly fixes your water-level woes.
Raising a Float Ball
How to Do It
- STEP 1: Remove the tank lid. Carefully set it aside.
- STEP 2: Locate your toilet float ball and arm inside the tank. As the name suggests, it looks like a large ball attached to a metal arm.
- STEP 3: Gently bend the float arm into a higher position. This will increase the amount of water that’s able to fill your toilet tank by allowing the fill valve to stay open longer. In turn, it will allow more water to flow into your toilet bowl, raising the water level.
Raising a Cylinder Float
Items you’ll need
- Screwdriver
How to Do It
- STEP 1: Remove the toilet tank lid. Set it aside.
- STEP 2: Locate the cylinder float. It looks like a tall cylinder standing vertically in the toilet tank and is connected to the fill valve.
- STEP 3: Raise the float. Your cylinder float will have either an adjustment clip or screw. If you have a clip, simply pinching it will allow it to release so you can adjust it to a higher position. If your float has an adjustment screw, use your screwdriver to turn it counterclockwise to raise the float (take it one rotation at a time to make sure you don’t overtighten). With the float in a higher position, you should now see the water level in the toilet tank rise.
Adjust the Refill Tube
The refill tube is located inside the toilet tank, and its job is to direct water from the fill valve into the overflow tube, allowing the toilet bowl to correctly refill after a flush. That’s the goal, at least—if the refill tube is in the wrong position, it can actually prevent the water level from reaching its ideal height. Adjusting it is fairly straightforward, and you might find doing so fixes your problem in a flush (oops—we mean flash!).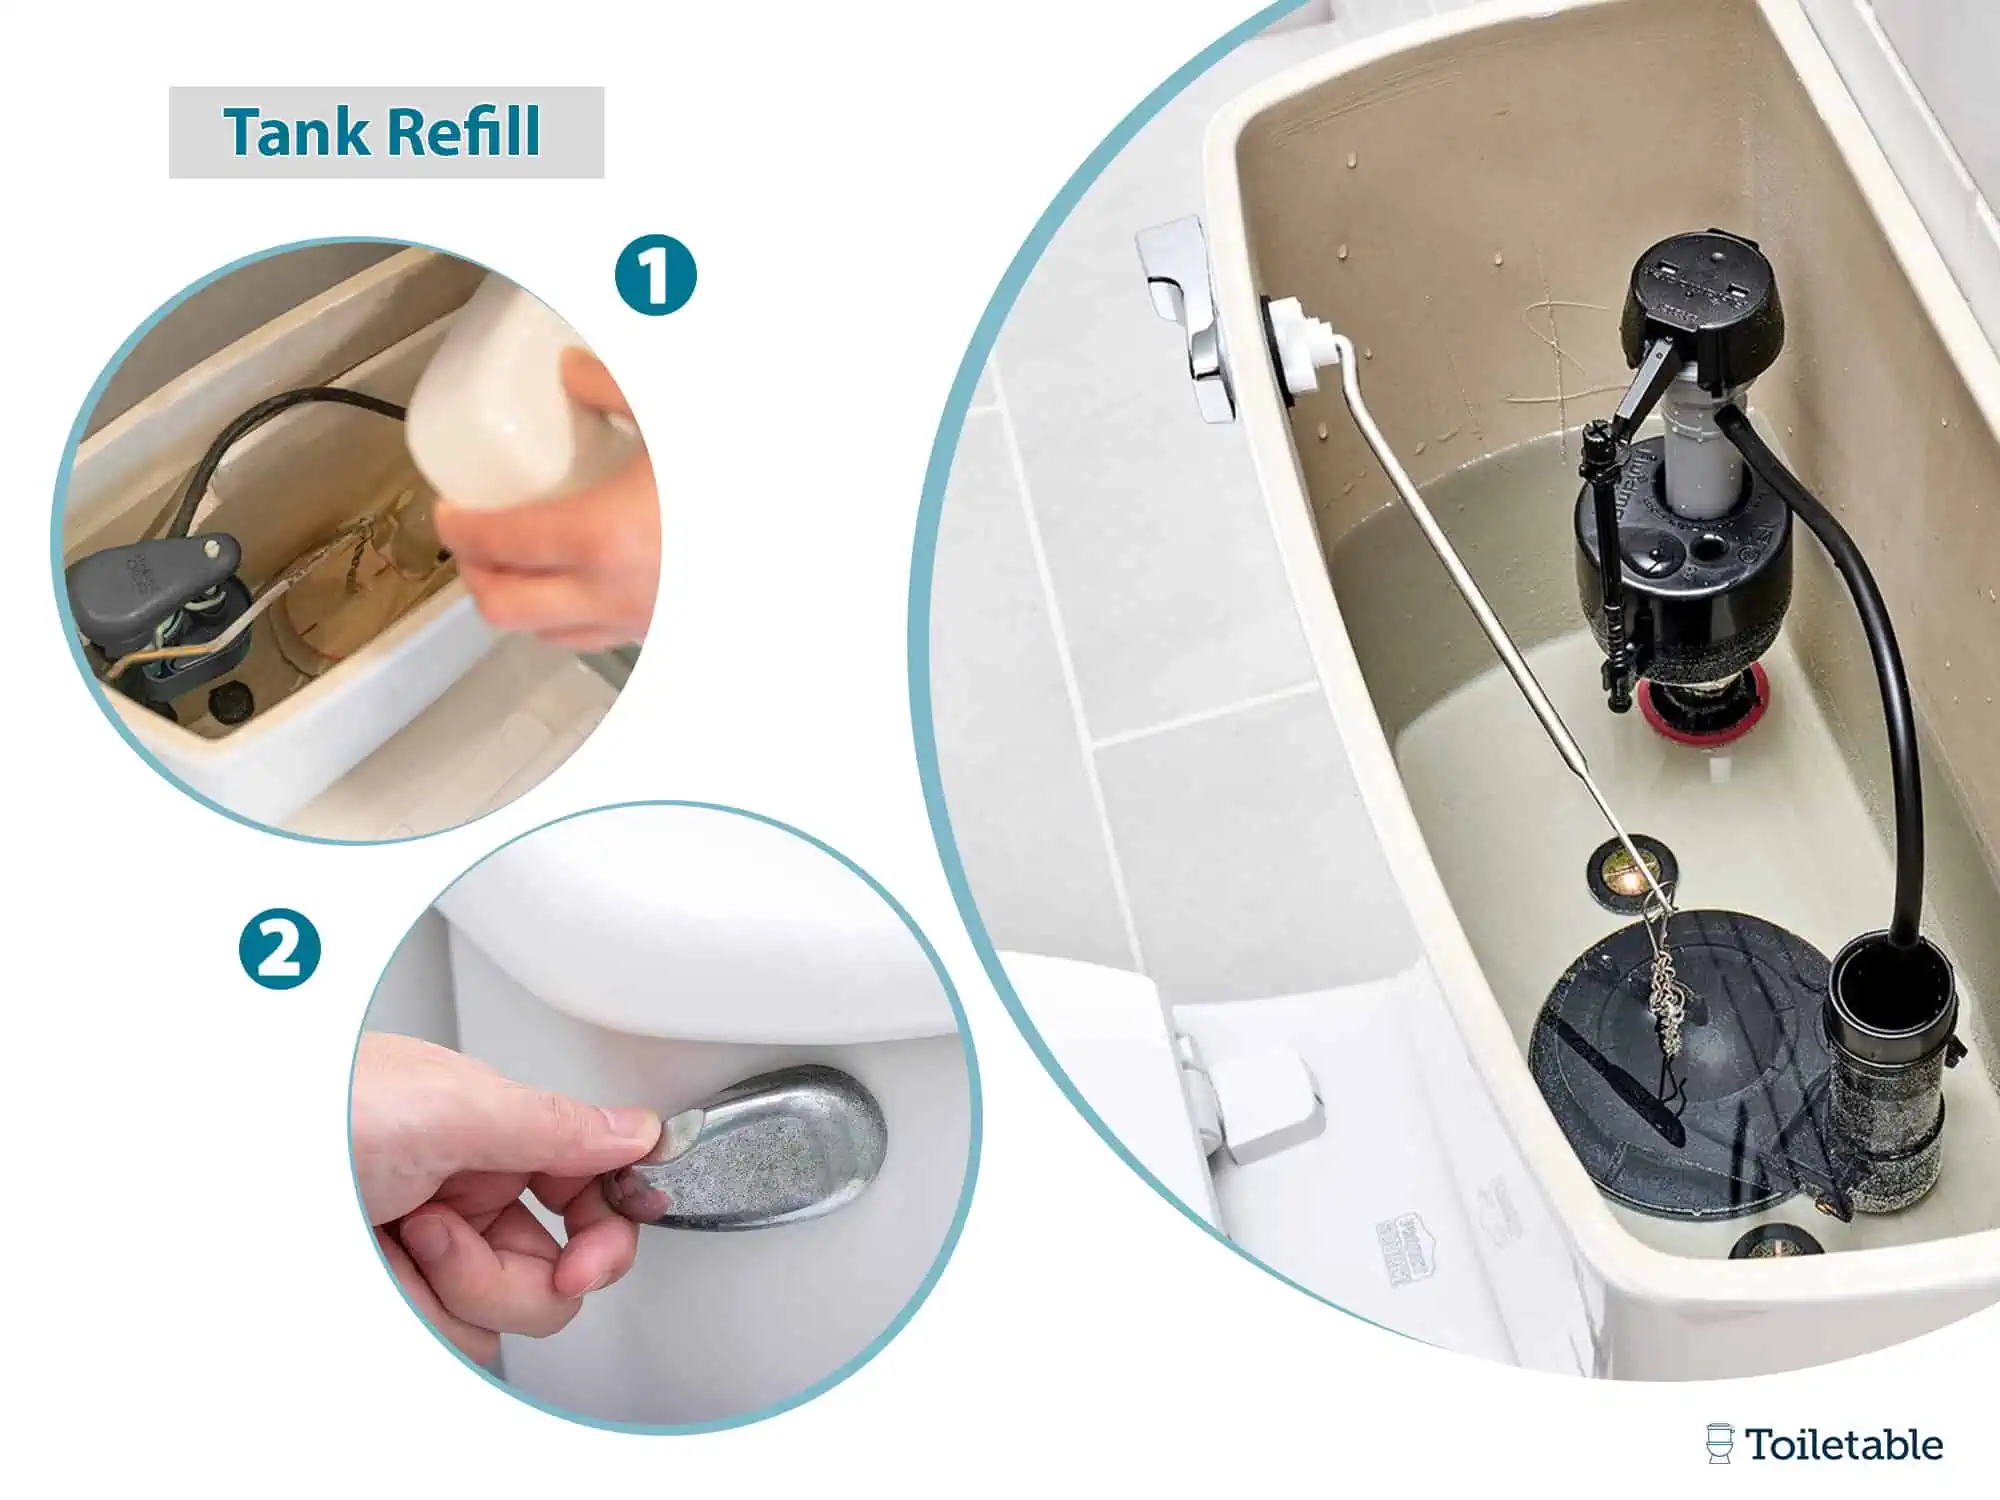
How to Do It
- STEP 1: Remove the toilet tank lid. Put it aside.
- STEP 2: Locate the refill tube. It is a flexible piece of tubing connected to the fill valve.
- STEP 3: Check the refill tube’s position. It should be clipped to the top of the overflow tube (but not inside it) to allow it to direct water into it but not siphon water out.
- STEP 4: Make any necessary adjustments. Move the refill tube into the correct position by using the clip provided.
- STEP 5: Check for any damage, kinks, or clogs. If you find one of these issues and are unable to fix it, you may need to replace the refill tube. Replacements can be purchased at hardware stores.
Adjust the Fill Valve
The fill valve is a vertical tube-shaped part located inside the toilet tank. It controls the water level inside the tank—so it’s not hard to see how a problem with this part could contribute to a wonky water level. The fill valve sometimes shifts out of alignment, hindering the water’s ability to fill up the tank.
How to Do It
- STEP 1: Take off the toilet tank lid. Gently put it aside.
- STEP 2: Locate the fill valve. It should stand up straight and attach securely to the tank.
- STEP 3: Reposition the fill valve if needed. Make any necessary adjustments to the fill valve’s position to ensure it can function properly.
- STEP 4: Inspect the fill valve for signs of buildup or damage. If you notice mineral buildup, you can try to clean it out. If the buildup is too extensive or if the fill valve is damaged, you may need to replace it. You can buy a new fill valve at a hardware store—they come with their own straightforward installation instructions.
Check the Flapper
The flapper is a rubber part inside the toilet tank that lifts when the toilet is flushed, allowing water to flow into the bowl. When this part becomes misaligned or damaged, it can sometimes close too early and prevent enough water from making it to the toilet bowl. We have a comprehensive DIY guide on replacing a flapper here, but here’s a quick rundown.
Items you’ll need
- New flapper
How to Do It
- STEP 1: Remove the toilet tank lid. Place it aside.
- STEP 2: Flush the toilet. This will drain the tank.
- STEP 3: Inspect the flapper for misalignment or damage. You may be able to move a misaligned flapper back into the proper position. If so, your flapper repair journey ends here—congratulations! If you can’t, or if the flapper is damaged, it’s time to replace it. New flappers can be purchased at the hardware store.
- STEP 4: Remove the old flapper. Unhook it from the flush valve and disconnect the chain.
- STEP 5: Install the new flapper. Put it in the correct position and attach it to the flush valve. Connect the chain to the flush arm.
- STEP 6: Turn the water supply back on and do a test flush. Check to see if your new flapper works correctly, and observe the water level in the toilet bowl.
Unclogging a Toilet
A clog in the toilet can prevent it from refilling properly, leading to a too-low water level. If you suspect your toilet is clogged, your first line of defense is to use a plunger. If you don’t have one handy, you can try pouring hot (but not boiling) water into the drain and allowing it to sit for several minutes before flushing. If all else fails, you may need a toilet auger to bust through the clog. Check out our comprehensive guide on unclogging a toilet for everything you need to know!
Once the blockage is out of the way, you should find that your toilet bowl refills properly to the ideal level once again.
Clean the Rim Jets
Rim jets are small holes that allow water to flow from the tank to the bowl when the toilet is flushed. They’re located under the toilet bowl’s rim (surprise, surprise, right?). Sometimes these small holes can become clogged with mineral buildup, preventing water from freely flowing into the toilet bowl. When this happens, you may notice the water level in your toilet bowl looking a little shallow. Cleaning them is pretty simple, though, so don’t fret!
Items you’ll need
- White vinegar
- Small cleaning brush or toothbrush
- Baking soda (optional)
How to Do It
- STEP 1: Locate the rim jets. They are located in the toilet bowl underneath the rim.
- STEP 2: Soak with white vinegar. Apply the vinegar to the rim jets directly or by pouring it onto your cleaning brush or toothbrush and then applying.
- STEP 3: Allow the vinegar to sit. Leave the vinegar to work its magic for 5 to 10 minutes.
- STEP 4: Scrub away the mineral buildup. Using your cleaning brush or toothbrush, scrub the rim jets to remove the mineral buildup.
- STEP 5: Flush the toilet. Observe the water level in the bowl after it refills.
- STEP 6: For stubborn buildup, use baking soda and vinegar. Got buildup that just won’t budge? Make a paste of 1 part white vinegar and 1 part baking soda. Apply the paste to the rim jets with your cleaning brush, and let sit for 10 minutes. Carefully scrub with your cleaning brush. The gently abrasive properties of baking soda will help remove even tough mineral deposits.
Clean the Siphon Jet
The siphon jet is a large hole near the bottom of the toilet bowl that directs water from the tank downward, helping the toilet create a powerful flush. It’s typically located right in front of the toilet’s drain hole. When the siphon jet becomes blocked with debris or mineral buildup, it can lead to a weak flush and a low water level in the toilet bowl. 
Items you’ll need
- Small cleaning brush or toothbrush
- White vinegar (optional)
How to Do It
- STEP 1: Check the siphon jet. If you notice any debris or mineral buildup creating a blockage, it’s time to clean it.
- STEP 2: Scrub with your cleaning brush. Gently clear out any blockages you see.
- STEP 3: For stubborn buildup, use white vinegar. Pour 1 or 2 cups of white vinegar into the toilet bowl directly over the siphon jet. Allow it to sit for 5 to 10 minutes. Then scrub again using your cleaning brush.
- STEP 4: Flush the toilet. Observe the force of the flush and the water level once the toilet bowl refills.
Fixing Blocked Vents
If your toilet has a blocked vent, too little water in the bowl probably won’t be its only issue. Blocked plumbing vents also cause toilets to make gurgling noises and emit unpleasant odors. Fixing this issue is usually a job for a plumber, but if you’re feeling adventurous, you can try some DIY tricks first. Get dressed—we’re heading outside for these hacks.
Items you’ll need
- Garden hose
- Ladder
- 20- or 25-foot toilet auger or snake
- Air compressor with nozzle attachment
- Cloth or rag
Method 1: Use a Garden Hose
First, you’ll want to locate your plumbing vent pipe. You’ll usually find it vertically sticking out from your roof above your bathroom. Connect your garden hose to a water spigot, and take the hose with you. Taking any necessary safety precautions, use a ladder to reach the vent. Insert the garden hose into the vent pipe. Go back down the ladder and turn on the water. Allow it to run for 2 to 5 minutes, then turn the water off and remove the garden hose from the vent. For minor plumbing vent blockages, the water pressure from the garden hose may be enough to unblock your vent. Head back to the bathroom to see if the water in the toilet bowl has risen to the correct level. Hopefully, your toilet will be a little less vocal and smelly as well!
Method 2: Use a Toilet Auger (aka Snake)
Locate the plumbing vent pipe on the roof again. Climb up your ladder with a 20- or 25-foot toilet auger. This tool is a master clog-buster, so it should be able to break up even a stubborn blockage. Place the auger into the opening of the vent pipe and rotate the handle to feed it further inside. Note any resistance you feel, as this is likely the clog. Once you’re confident you’ve broken up the blockage, bring the auger back up out of the pipe. You can use your garden hose to flush away any remaining debris by placing it in the pipe and turning on the water.
Method 3: Use an Air Compressor
Prepare an air compressor with a nozzle attachment. Access the plumbing vent pipe on the roof by climbing up your ladder with the nozzle and a cloth or rag. Next, place the nozzle attachment into the pipe and create a tight seal by placing your cloth or rag around the opening; this will prevent the air from escaping. Give the pipe a few blasts of air. With any luck, this will dislodge any annoying clogs or debris.
Learn more about how toilets use vent pipes.
Decreasing the Water Level
Maybe you have the opposite problem: a too-high water level in the toilet bowl. This issue can be just as bad—or even worse—than a too-low water level. It can lead to issues like overflow and water damage to your bathroom, so it’s important to address it immediately. In this case, potential causes might include issues with components inside the toilet tank, toilet clogs, blocked plumbing vents, or hairline cracks in the bowl or tank.
Too Much Water in the Toilet Tank
If your toilet tank is filling in an overzealous manner, you may find that your cup—or toilet bowl, in this case—runneth over! When the toilet tank fills with too much water, it can allow an excessive amount to flow into the toilet bowl. Here are a few tank components to check.
Adjust the Float
When the float is set too high, it can allow the tank to fill past the ideal level. This extra water will often flow right into the toilet bowl, leading to the ever-rising water level. 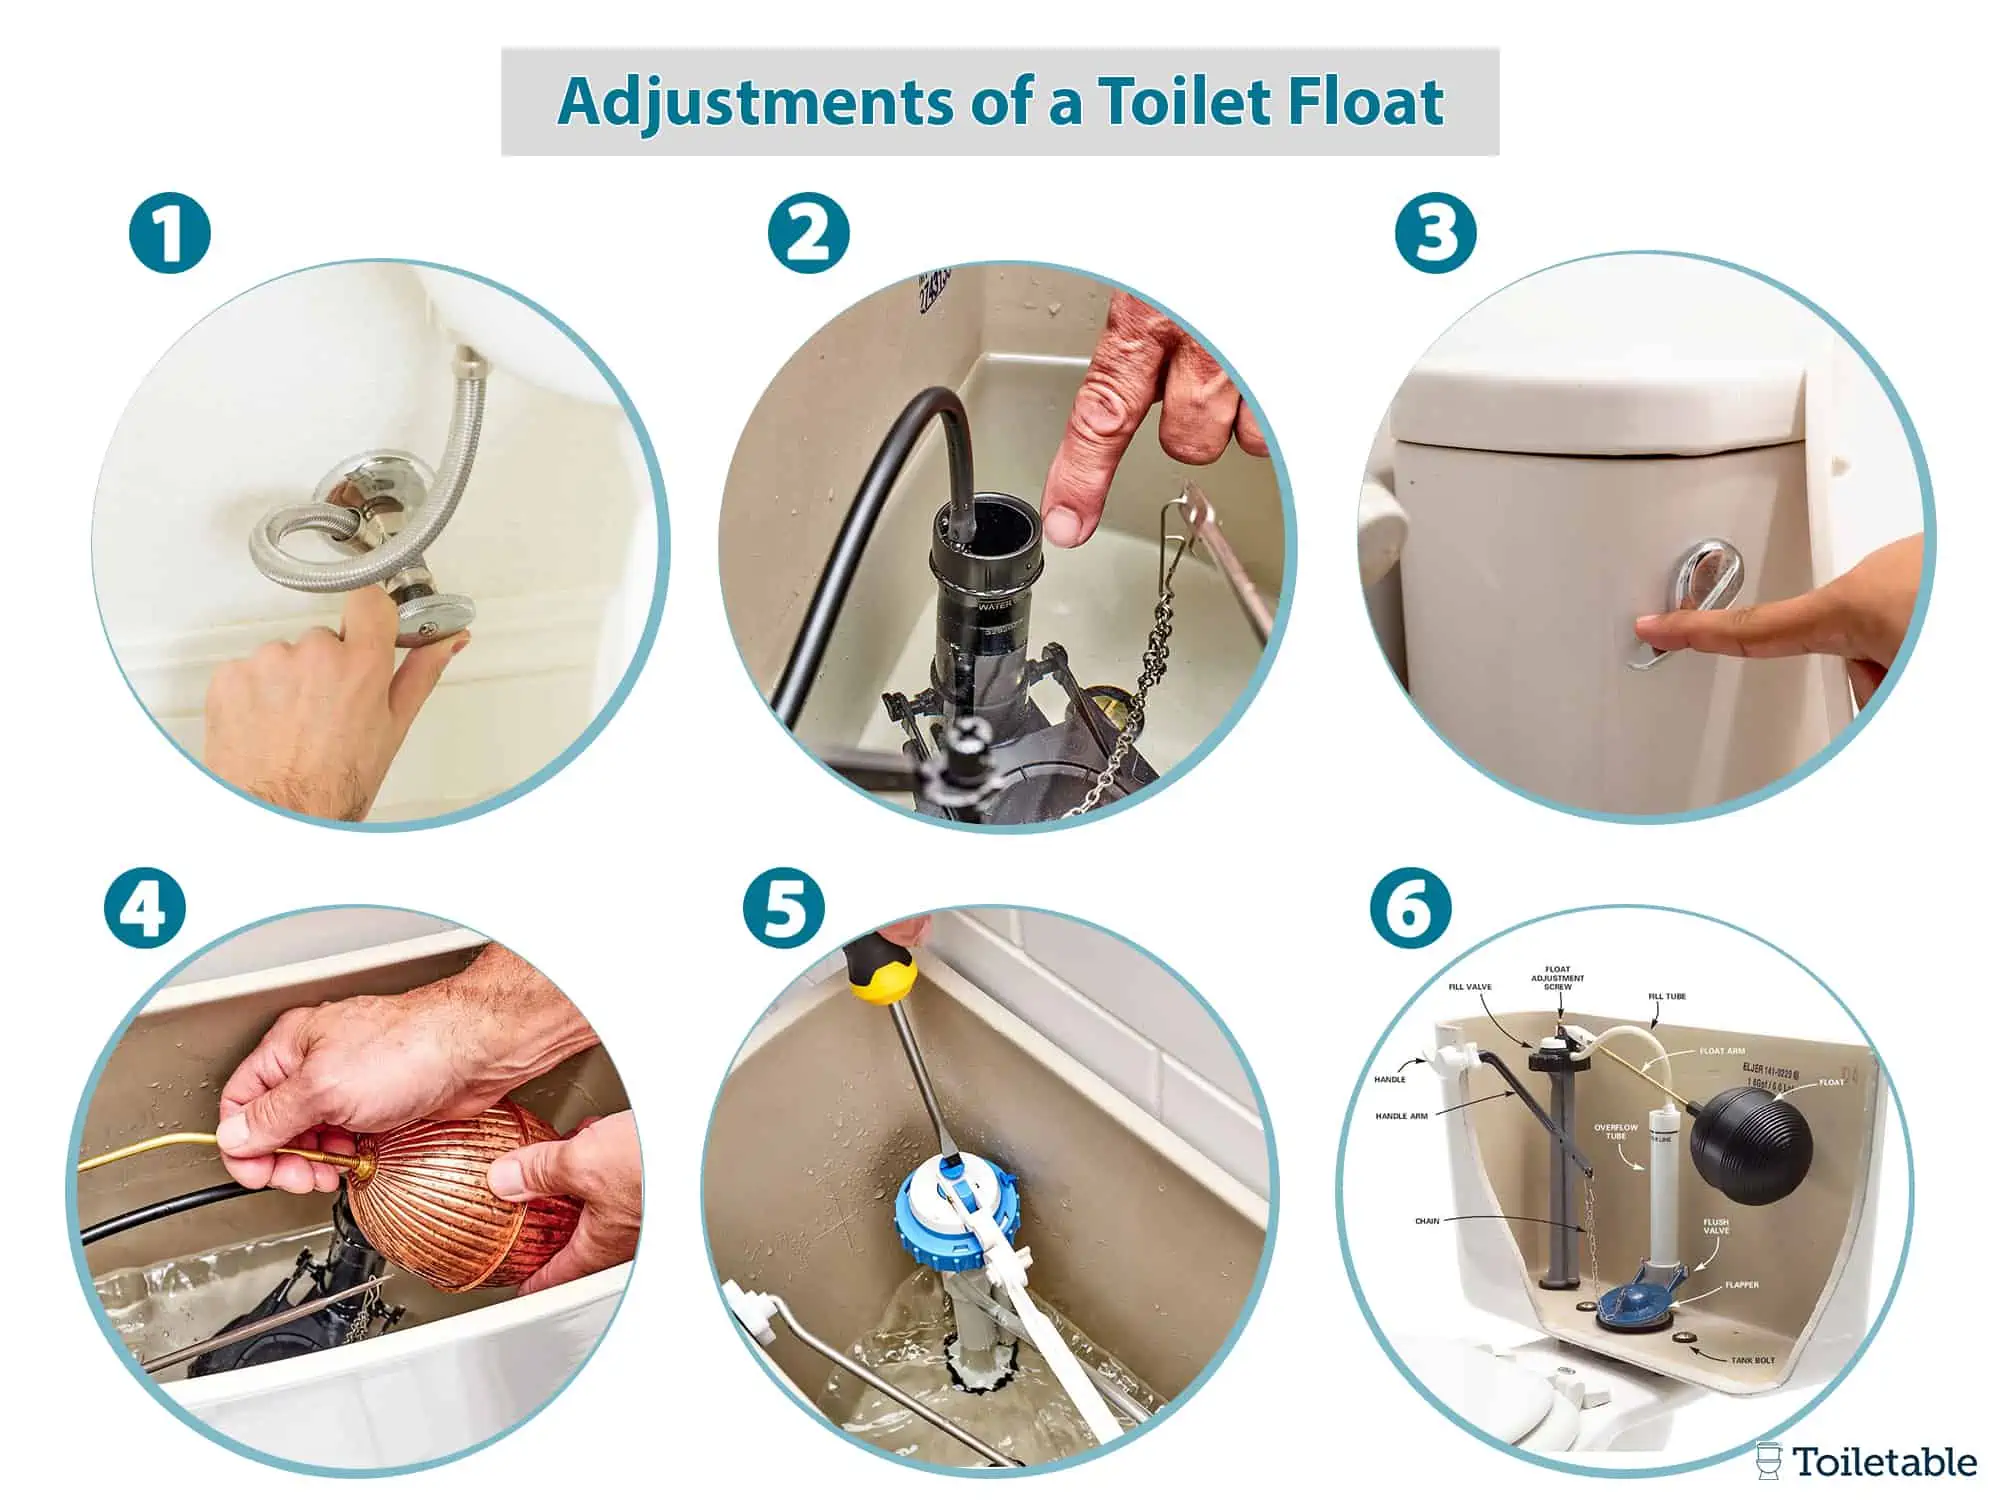
Read our full guide about adjusting a toilet float valve.
Lowering a Float Ball
How to Do It
- STEP 1: Remove the tank lid. Carefully set it aside.
- STEP 2: Find your toilet float ball and arm inside the tank. It looks like a large ball attached to a metal arm.
- STEP 3: Gently bend the float arm into a lower position. This will decrease the amount of water that’s able to fill your toilet tank. Less water will flow into your toilet bowl as a result, lowering the water level.
Lowering a Cylinder Float
Items you’ll need
- Screwdriver
How to Do It
- STEP 1: Remove the toilet tank lid. Set it aside.
- STEP 2: Find the cylinder float. It looks like a tall cylinder standing vertically in the toilet tank; it is connected to the fill valve.
- STEP 3: Lower the float. The cylinder float will have either an adjustment clip or screw. If it has a clip, simply pinch it to allow it to release. Adjust it to a lower position. If the float has an adjustment screw, turn it clockwise with your screwdriver to lower the float (don’t over tighten—take it one rotation at a time). With the float in a lower position, the water level in your toilet tank should also drop.
Adjust the Fill Valve
The fill valve is a component that controls the water level inside the tank. If it is faulty or misaligned, it can cause your toilet tank to fill to epic proportions, leading to a too-full toilet bowl.
How to Do It
- STEP 1: Take off the toilet tank lid and put it aside.
- STEP 1: Locate the fill valve. It is a vertical tube-shaped part that should stand up straight and attach securely to the tank.
- STEP 1: Reposition the fill valve if needed. Adjust the fill valve’s position as needed to ensure proper function.
- STEP 1: Inspect the fill valve for damage. If you notice any, you may need to replace the fill valve. You can buy a new one at a hardware store. It should come with its own straightforward installation instructions.
Check the Overflow Tube
The overflow tube is located inside the toilet tank near the fill valve. Its job is to direct excess water into the bowl if the tank gets too full. If your overflow tube is cracked, it can cause water leakage that overfills the toilet tank and eventually makes your toilet bowl look like the deep end of a swimming pool!
Items you’ll need
- Towel, cloth, or sponge
- Cup
- Replacement overflow tube
- Epoxy (optional)
How to Do It
- STEP 1: Take off the toilet tank lid. Put it aside.
- STEP 2: Flush the toilet. After turning off the water supply, flush the toilet to remove excess water from the tank. Use a towel, cloth, or sponge to dry up any remaining water.
- STEP 3: Check the overflow tube for cracks or damage. You can visually inspect for cracks and run your hand along the overflow tube to feel for weak spots.
- STEP 4: Test for leaks. Pour a small amount of water into the tank with your cup, and look for any drips or leaks coming through cracks in the overflow tube.
- STEP 5: Use epoxy for a temporary fix. Thoroughly dry the overflow tube and apply waterproof epoxy to any cracks by following the manufacturer’s instructions. This should temporarily stop water leakage, but you’ll need to replace the overflow tube for a permanent fix.
- STEP 6: Replace the overflow tube. You can purchase a replacement at a hardware store. First, remove the old tube. Loosen the nuts holding the flush valve at the bottom of the tank and carefully lift out the entire assembly. Install the new overflow tube according to the manufacturer’s instructions. Make sure it fits snugly, but don’t over tighten.
- STEP 7: Reconnect the water supply and test. Allow the tank to fill, check for any leaks, and observe the water level in the toilet bowl.
Unclogging a Toilet
A clogged toilet is a common cause of a toilet bowl that looks like a watery abyss. If you think you may be dealing with a clogged toilet, your tool of choice should be a plunger (make sure you use the right one—they aren’t all created equally!).

If you’re fresh out of plungers, you can try pouring hot (not boiling) water into the drain.
Allow the hot water to sit for several minutes, and then flush. For very stubborn clogs, you may need to break out the big guns: a toilet auger. Our detailed guide on unclogging a toilet will give you step-by-step instructions on choosing the right plunger, using a toilet auger, and more DIY fixes, so check it out.
Once you’ve taken care of the clog, your toilet bowl should drain back down to a proper level so you can flush without worries once again.
Do I Need to Know My Toilet’s Water Surface Area?
While it can be helpful to know your toilet’s water surface area for many reasons, you don’t need to worry about it as much when considering toilet water level. However, you definitely need to confirm that your toilet bowl has an ideal water level before measuring the water surface area. The water surface area measurement can come in handy when choosing a new toilet seat, understanding how water-efficient your toilet is, considering flushing performance, and determining the best cleaning methods.
Measuring Toilet Water Surface Area
Items you’ll need:
- Rubber gloves
- Tape measure or ruler
- Pen and paper
- Calculator (optional)
Here’s how to measure the surface area of the water in your toilet bowl.
- STEP 1: Put on your rubber gloves. Any measurements you take will be inside the bowl, so you’ll want to protect your hands.
- STEP 2: Flush and allow the toilet bowl to refill with water from the tank; wait until the water stops flowing into the bowl to ensure it has filled completely.
- STEP 3: Measure the length. Using a tape measure or ruler, measure from the front edge of the water surface inside the bowl to the back edge. This should be the longest line across the water’s surface. Write down the length measurement.
- STEP 4: Measure the width. Next, take your width measurement by measuring perpendicular to the length measurement you just took. You’ll be measuring across the widest point of the water surface. Record this measurement.
- STEP 5: Calculate the surface area. Multiply the length measurement by the width measurement. Use a calculator if desired. Surface area is measured in square inches. Your calculation will look something like this example: 10 inches x 7 inches = 70 square inches.
In Our Final Opinion
There you have it, folks—the inside scoop on toilet bowl water level. Keep one golden rule in mind when adjusting your toilet bowl’s water level: Water in the toilet bowl should just cover the P-trap to allow for proper suction and prevent stinky sewer gasses from invading your personal space (rude!).
If you find yourself in a soggy situation with a too-high or too-low water level in the future, now you’ll know not to panic. Simply take a deep breath, follow the directions in this guide, and adjust the water level like the DIY master you are. Your toilet will thank you.