
Is your toilet bowl too empty to flush or so full it’s one drop away from spilling out onto your shoes? You may have an issue with your toilet float!
The toilet float’s height controls the water level in the toilet tank, determining how much water makes it into the toilet bowl. A float that’s too low means a shallow water level, and one that’s too high means you’ll be staring down a potential overflow situation!
Even if you’re a DIY beginner, don’t fret—adjusting a float is super easy! Whether your toilet is equipped with a ballcock or cylinder float, this article will provide actionable steps to get it back to the correct height in a splash.
Key Points
- There are two kinds of toilet floats: a ballcock float (or float ball) and a cylinder float (or float cup).
- This DIY fix is beginner-friendly—all you need is a screwdriver!
- Always turn off the water before you begin.
- The ideal tank water level is about one to two inches below the top of the overflow tube.
What is a Toilet Float?
Simply put, the toilet float controls the water level in the toilet tank. There are two types of floats: ballcock floats and cylinder floats. Also known as float balls, ballcock floats are found in most older toilets. They look like a large ball attached to a flexible metal or plastic arm. Cylinder floats (also called float cups) are common in modern toilets. As the name suggests, this float looks like a small cylinder and is attached vertically to the fill valve.
Regardless of the type of float, when it’s positioned too high, it will allow the toilet tank to fill up with too much water. This can lead to leaks, overflows, and water bills so high they wash away your hard-earned cash. Studies show a leaky toilet can easily waste up to 200 gallons of water a day—that’s 73,000 gallons a year! A toilet float that’s too low won’t allow the tank to fill up enough, which comes with its own host of issues: weak flushes, irritating clogs, and nauseating sewer smells—oh my!
Rest easy—it only takes a few minutes to easily get your toilet float back to the ideal height. This handy instructional guide to toilet floats will walk you through adjusting both ballcock and cylinder floats. Let’s dive in!
Diagnosing Float Problems
Before beginning any repair, it’s important to identify the correct cause for your problem to save yourself time and frustration. Here are a few symptoms of an incorrectly positioned float:
- A toilet that runs constantly or intermittently
- A toilet that refills briefly without being used (also called phantom flushes)
- Toilet tank water level that’s too high or too low
- Toilet bowl water level that’s too high or too low
- Toilet bowl water levels that vary between flushes
- A tank that refills slowly
If you’ve successfully diagnosed a toilet float issue, it’s time to move on to the DIY repair.
Adjusting a Toilet Float Procedure: Ballcock Floats
You can adjust a ballcock float in six easy steps. If your float ball has a metal arm, you won’t need any tools to complete this fix. Make sure you have a screwdriver on hand to adjust a float with a plastic arm.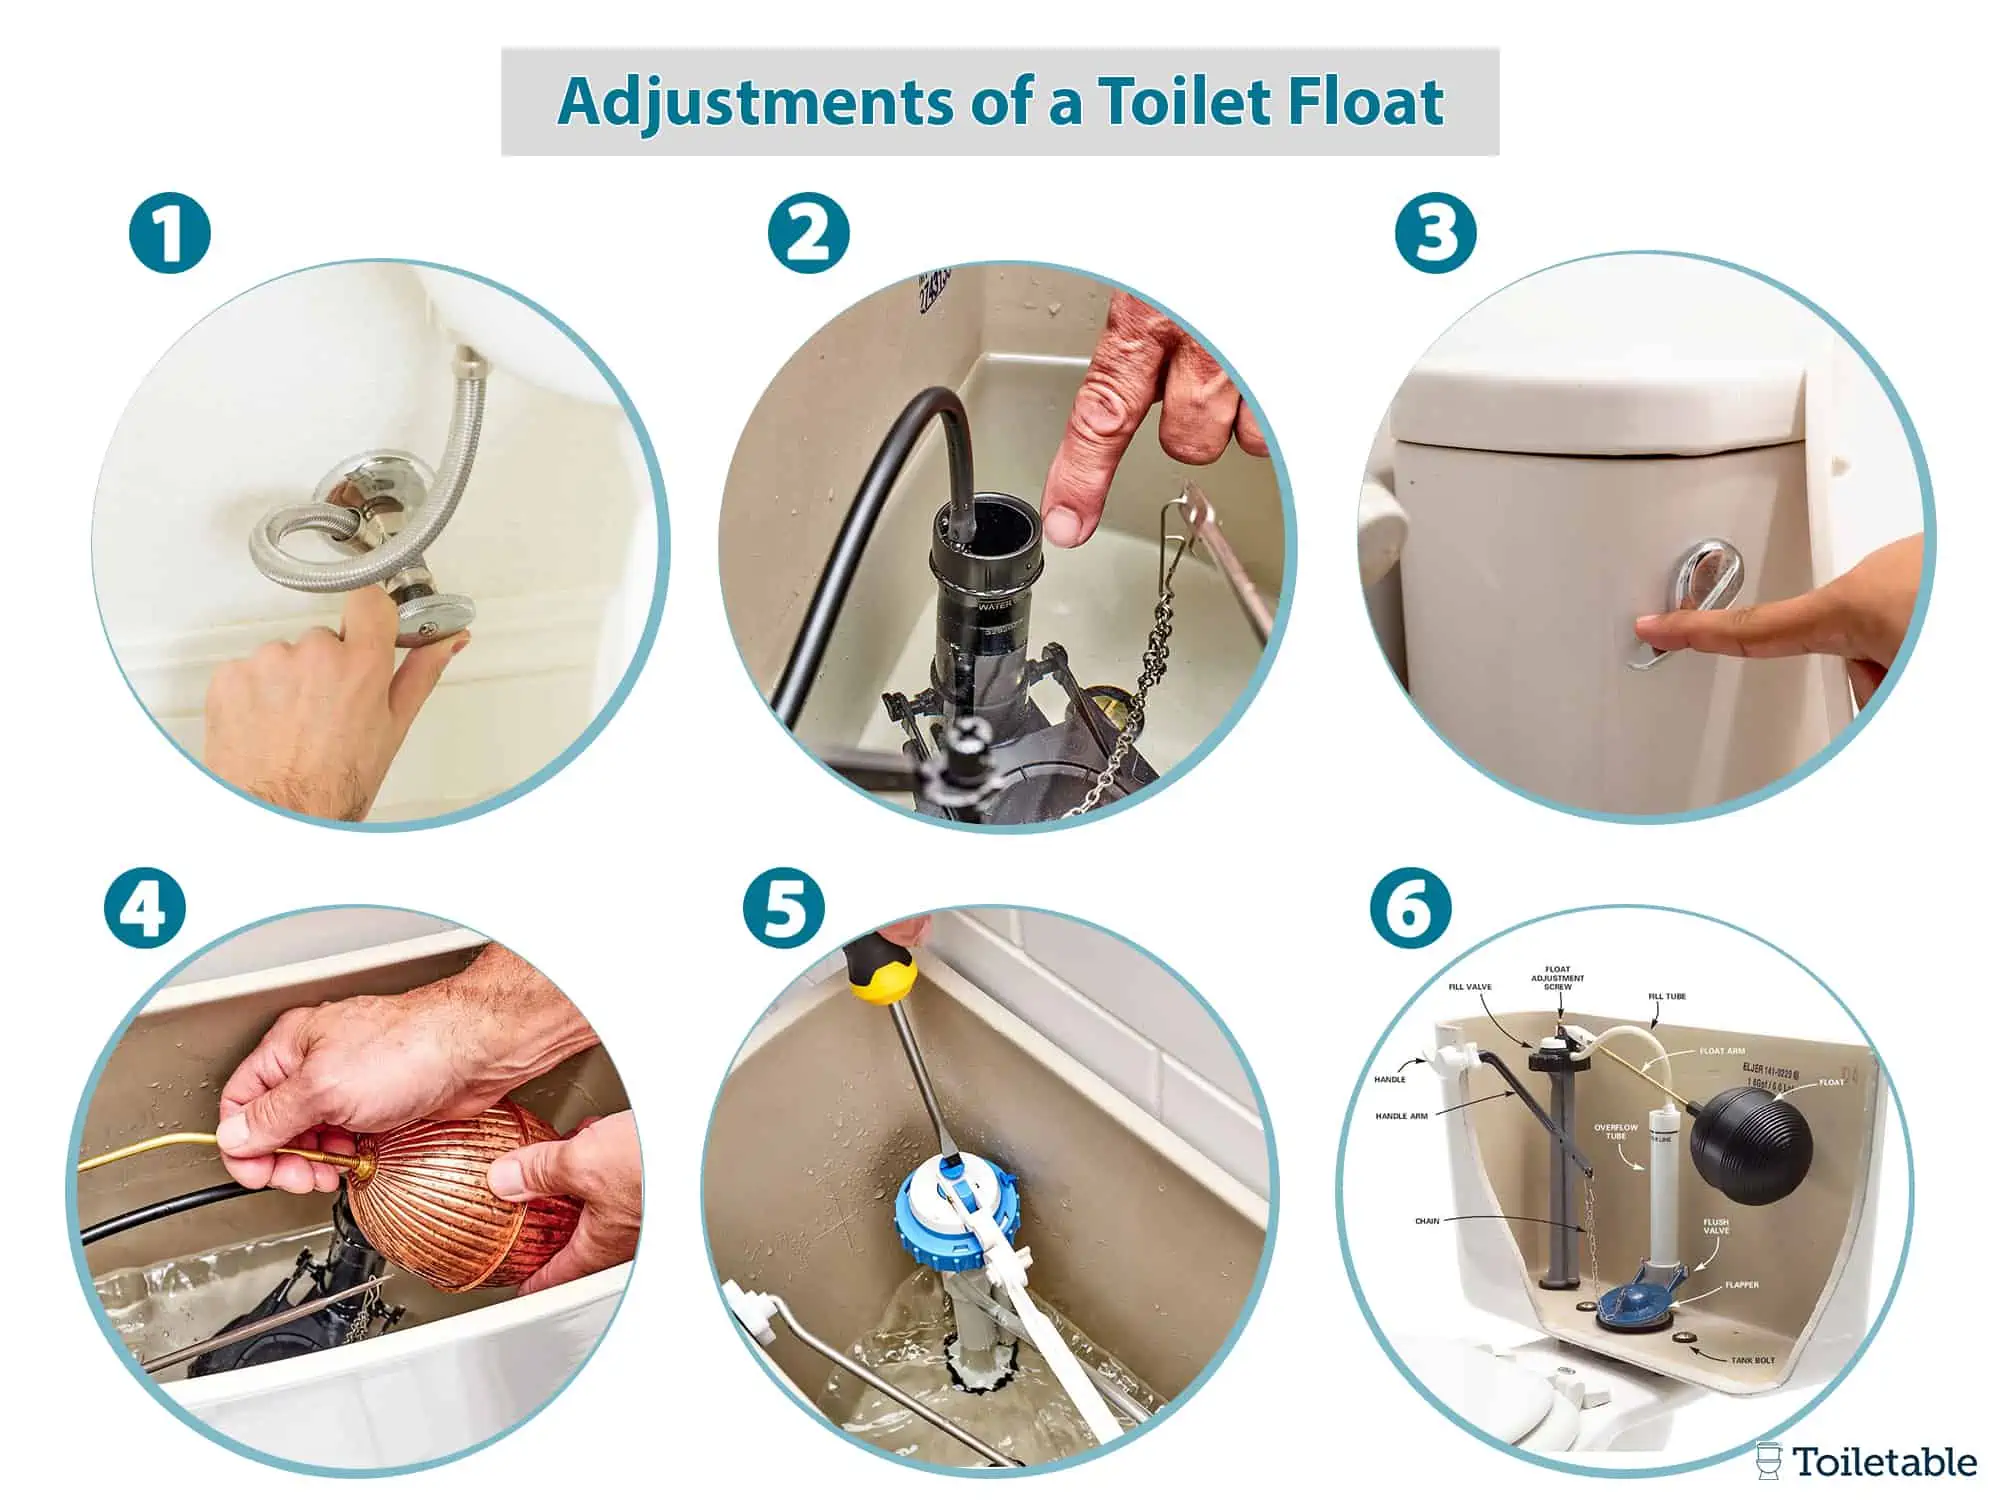
Step 1: Turn Off the Water Supply
Remember this golden rule: always shut off the water supply before any DIY plumbing project. Save yourself the mess and wasted water with this simple step.
Step 2: Check the Current Tank Water Level
Remove the toilet tank lid and set it aside. Some toilet tanks have a water level mark indicating the correct water level. If yours doesn’t, no worries—the ideal water level is approximately one to two inches below the top of the overflow tube. Note whether the water level is above or below this level.
Step 3: Flush the Toilet
Now that you’ve determined your toilet tank water level, it’s time to empty the tank. Simply flush the toilet to remove the extra water.
Step 4: Check the Toilet Float
Next, check the toilet float. Inspect every part of the float mechanism, including the plastic ball and float arm, for signs of damage. Look for water inside the float or cracks in the plastic ball. If you see this kind of damage, you’re better off replacing the entire float instead of trying to make an adjustment.
Step 5: Adjust the Float Height
Now, it’s time for the big adjustment. If your water level is too low, you’ll need to raise the float; if it’s too high, you’ll need to lower it.
For a float equipped with a plastic arm, use a screwdriver for this step. If the water level is too low, loosen the screw by turning it counterclockwise to raise the float. For a too-high water level, lower the float by turning the screw clockwise to tighten it. You can tighten or loosen it by turning either clockwise or counterclockwise. Just be careful not to overdo it. How much you tighten or loosen the screw should be based on how bad the problem is. For a slight overflow, all you need is half a turn. A more severe overflow can typically be resolved with a full rotation or two.
For a float ball with a metal arm, you’ll simply need to bend the arm up or down to change the float’s position.
Step 6: Check if Everything Sits Right
It’s now time to confirm that the water level is right. Re-open your toilet’s water supply and allow 60 to 120 seconds for it to fill up. Once the inflow stops, check if the level is one to two inches below the overflow tube. Loosen the system by turning it for another half-turn until you reach the right level. Is the level too high? If so, you’ll need to flush the toilet and repeat the process, beginning with an empty toilet.
Adjustments of a Cylinder Toilet Float
To adjust a cylinder toilet float, you will follow the same first two steps as an adjustment to a ballcock float
Step 1 – Stop the Water Supply
As always, begin by shutting off the water supply. Your dry clothes will thank you later.
Step 2 – Check the Current Water Level
When the water supply stops, check the toilet’s water level. Remember, the ideal water level is approximately one to two inches below the overflow tube.
Step 3 – Lookout for the Adjustment Stem
Now, look for a tiny tube dangling horizontally from the top of the toilet’s fill valve. It may also run parallel to the valve. Find the clip on the tube.
Step 4 – Adjusting the Clip
Squeeze (or release) the clip and move it depending on how you want to adjust the height. You can raise it to increase or lower the water level to prevent an overflow.
While keeping your float at half an inch, use your fingers to hold the dial against the edge of the stem firmly. Keep holding the dial and make a full rotation by rotating the stem clockwise or counterclockwise.
Step 5 – Confirm the Results
Turn the water back on and let it flow for at least two minutes. Now, check the water level and confirm it sits at the right level (one to two inches below the overflow tube). If not, flush the toilet and repeat the process.
Final Thoughts
Learning how to adjust toilet floats is a beneficial skill. It’s important to know how to do this yourself at home. Doing so can save you valuable time and money while preventing further leakages and keeping your toilet in top-notch condition. This is an easy DIY fix. No plumber is needed!
Congratulations on learning all there is to know about fixing a toilet float. You’re ready to give it a try.