• Skip to primary navigation
  • Skip to main content
  • Skip to primary sidebar
  • Skip to footer
Logo of "Toiletable" with an illustration of a toilet and a sparkling star on the tank.

Toiletable

Your Trustworthy Toilet Guide

  • Home
  • Toilet Guides
    • Fix & Repair
      • Fixing a Toilet (Master Guide)
      • Fix a Running Toilet
      • Toilet Leak Repair
      • Fix a Toilet Chain
      • Replace a Flapper
      • Fix a Plastic Flapper
      • Fix Wax Rings
      • Double Flush Repair
      • Adjust a Toilet Float
      • Empty a Toilet Bowl
      • Rusted Tank Bolts Removal
      • Toilet Gurgling Fix
      • Shutoff Water Valve Fix
      • Fix Leaking from Base
      • Fix a Wobbly Toilet
      • Flushing without Water
      • Toilet Repair Costs
    • Cleaning
      • Cleaning a Toilet
      • Homemade Cleaning Recipes
      • Cleaning Mixtures
      • Disinfecting Item that Fell into Toilet
      • Clean Bowl Ring
      • Brown Water in Tank
    • Clogs
      • Unclog a Toilet
      • Plunging a Toilet
      • Remove Poop Clogs
      • Using a Toilet Snake
      • Never Flush Things
    • Installations
      • Toilet Installation
      • Toilet Seat Installation
      • Bidet Seat Installation
      • Toilet Flange Installation
      • Basement Toilet Installation
    • Measuring
      • Toilet Measuring
      • Toilet Seat Measuring
  • Brands
    • American Standard Toilets
      • American Standard ActiClean
      • American Standard Cadet 3
      • American Standard Cadet Pro
      • American Standard Champion 4
      • American Standard H2Option
      • American Standard Heritage
      • American Standard Boulevard
      • American Standard Fairfield
      • American Standard Colony
      • American Standard Edgemere
      • American Standard Studio
    • Kohler Toilets
      • Kohler Highline
      • Kohler Santa Rosa
      • Kohler San Raphael
      • Kohler Memoirs
      • Kohler Cimarron
      • Kohler Wellworth
      • Kohler Corbelle
      • Kohler Betello
      • Kohler Devonshire
      • Kohler Adair
      • Kohler Kathryn
      • Kohler Harken
      • Kohler Reach
      • Kohler Persuade
    • TOTO Toilets
      • TOTO Nexus
      • TOTO Drake
      • TOTO Ultramax-II
      • TOTO Supreme
      • TOTO Aquia IV Washlet
      • TOTO Washlet
      • TOTO Aimes
      • TOTO Entrada
    • Gerber Toilets
    • Swiss Madison Toilets
    • WoodBridge Toilets
    • Mansfield Toilets
    • Winzo Toilets
    • Icera Toilets
    • SaniFlo Toilet
  • Types
    • Flush Types
      • Flushing Toilets
      • Single Flush Toilets
      • Dual Flush Toilets
      • Pressure Assist Toilets
      • Quiet Toilets
      • Macerating Toilets
    • Shape
      • One Piece Toilets
      • Two Piece Toilets
      • Elongated Toilets
      • Round Toilets
      • Corner Toilets
      • Square Toilets
    • Style
      • Exposed Trapway
      • Skirted Trapway
      • Comfort Height
      • Wall Mounted
      • Tankless Toilets
    • Rough-in
      • 10-Inch Rough-In
      • 12-inch Rough-In
      • 14-inch Rough-In
      • 24-Inch Depth
    • Self-Cleaning Toilets
    • ADA Toilets
    • Smart Toilets
    • Compact Toilets
    • Portable Toilets
    • RV Toilets
    • WaterSense Certified
  • Accessories
    • Toilet Seats
      • Padded Seats
      • Heated Seats
      • Bidet Seats
      • Seat Risers
      • Duravit Seats
    • Handicap
      • Handicap Accessories
      • Grab Bars
    • Plungers
    • Brushes
    • Cleaners
      • Septic Tank Treatments
      • Bowl Cleaners
      • Drain Cleaners
    • Toilet Paper
      • RV Toilet Paper
      • Toilet Paper for Septic Tanks
    • Bathroom
      • Bathroom Heaters
      • Towel Warmers
    • Fill Valves
  • Resources
    • General Knowledge
      • Toilet Weight
      • Toilet Bowl Glazes
      • Water Level in Bowl
      • Keeping Seat Up
      • Toilet Vent Pipes
      • Human & Fertilizer
    • Comparison Guides
      • 1.28 vs. 1.6 GPF
      • Single vs. Dual Flush
      • Exposed vs. Concealed Trapways
      • Round vs. Elongated
      • Sink vs. Toilet Plungers
      • Comfort vs. Standard Height
      • Leach Field vs. City Sewers
      • Canister Flush vs. Flapper
      • Wood vs. Plastic Seats
      • Bidet vs. Toilet Paper
    • Water Saving Guides
      • Toilet Water Usage
      • MaP Flush Scores
    • Calculators
  • About Us
    • Affiliate Disclaimer
    • Privacy Policy
    • Contact Us

Install a Toilet Flange Guide | Homeowner Guide 2025

Last updated: Nov 12th, 2024 by Katie Powell

A flange is the part of the toilet which connects the toilet to the drainpipe in the floor. You may need to change the flange if it is cracked or broken and water is leaking from around the base of the toilet. While the task of replacing the flange itself is fairly straightforward, it does require a high amount of strength and precision.

If you are not as experienced with DIY plumbing work, we recommend calling in a professional to either complete the repair or offer advice while you complete the task. However, if you have the skills, experience, and time to do the repair yourself, we’ve outlined all the steps below for how to efficiently replace a broken flange.

Tools Needed

Installing a new toilet flange doesn’t require special tools. You will need the tools listed below.

Image showing tools needed for a toilet installation: new flange, screwdriver, old newspapers, rag, putty knife.

  • Old newspapers (to cover the floor)
  • Screwdriver
  • Putty knife
  • Rag
  • New flange

How To Install a Toilet Flange

There are 4 main steps to follow when installing a new toilet flange.

Steps to install a toilet flange, including preparation, old flange removal, measuring, and installation with screws.

Step 1- Preparing the Area

Now, first of all, replacing the flange is going to be messy. We recommend covering the bathroom floor with newspapers which can be cleaned up easily afterward. This step is pretty much the rule for any toilet repair-related activity. Next, disconnect the water supply to the toilet and flush the remaining water in the bowl. If any water still remains, you can use a sponge to get rid of it. Finally, unscrew the toilet from the ground and remove it, placing it on the newspapers to protect your floors.

Step 2- Out with the Old

To remove the old flange, first, you will have to scrape off the wax on the flange seal. Use a sharp object such as a putty knife to peel off all the wax from the seal. Then, unscrew the flange from the floor using a screwdriver. As a precaution against sewer gases, which may back up into your bathroom from the floor opening, we recommend stuffing a rag cloth over the opening of the drain while you work.

Step 3- Getting a Replacement

Clean up the flange with disinfectant so you can bring it to a hardware store to get a replacement. You’ll also want to measure the diameter of the drain pipe to be sure what size to look for. Flanges can be easily found in any plumbing supply or home improvement store, and it shouldn’t be hard to find a replacement for the old flange. While buying the flange, do not forget to purchase a new wax seal to go with it.

Step 4 – The Installation

Once you’re back home with the new flange, its time to complete the installation. Start by removing the rag from the drain so that you can install the new flange. Place the flange on the floor over the drain and tighten the bolts around it. These bolts should stick out of the floor and attach to the toilet. Secure the flange by using a screwdriver and the screws that should come with the product. Finally, place the wax seal on the bottom of the toilet in its designated space.

Now, carefully position your toilet over the drain so that the bolts are right below their respective holes. Push the toilet into place and tighten the nuts around the bolts to secure the toilet to the floor. In case there is any space between the toilet and the floor, you can insert some pennies to easily even everything out.

Make sure that the toilet is stable. Reconnect the water supply and flush the toilet once to make sure everything is working properly. If you notice the toilet is still leaking, then you need to consult an expert as to whether it is some other problem or improper installation.

3 Common Mistakes When Installing a Toilet Flange

Installing a toilet flange can often be messy, and in all that mess, it’s easy to make a mistake. Below are the most common mistakes people make when installing a toilet flange.

Four images showing common mistakes when installing a toilet flange: too tall flange, no water cut-off, over-tightening.

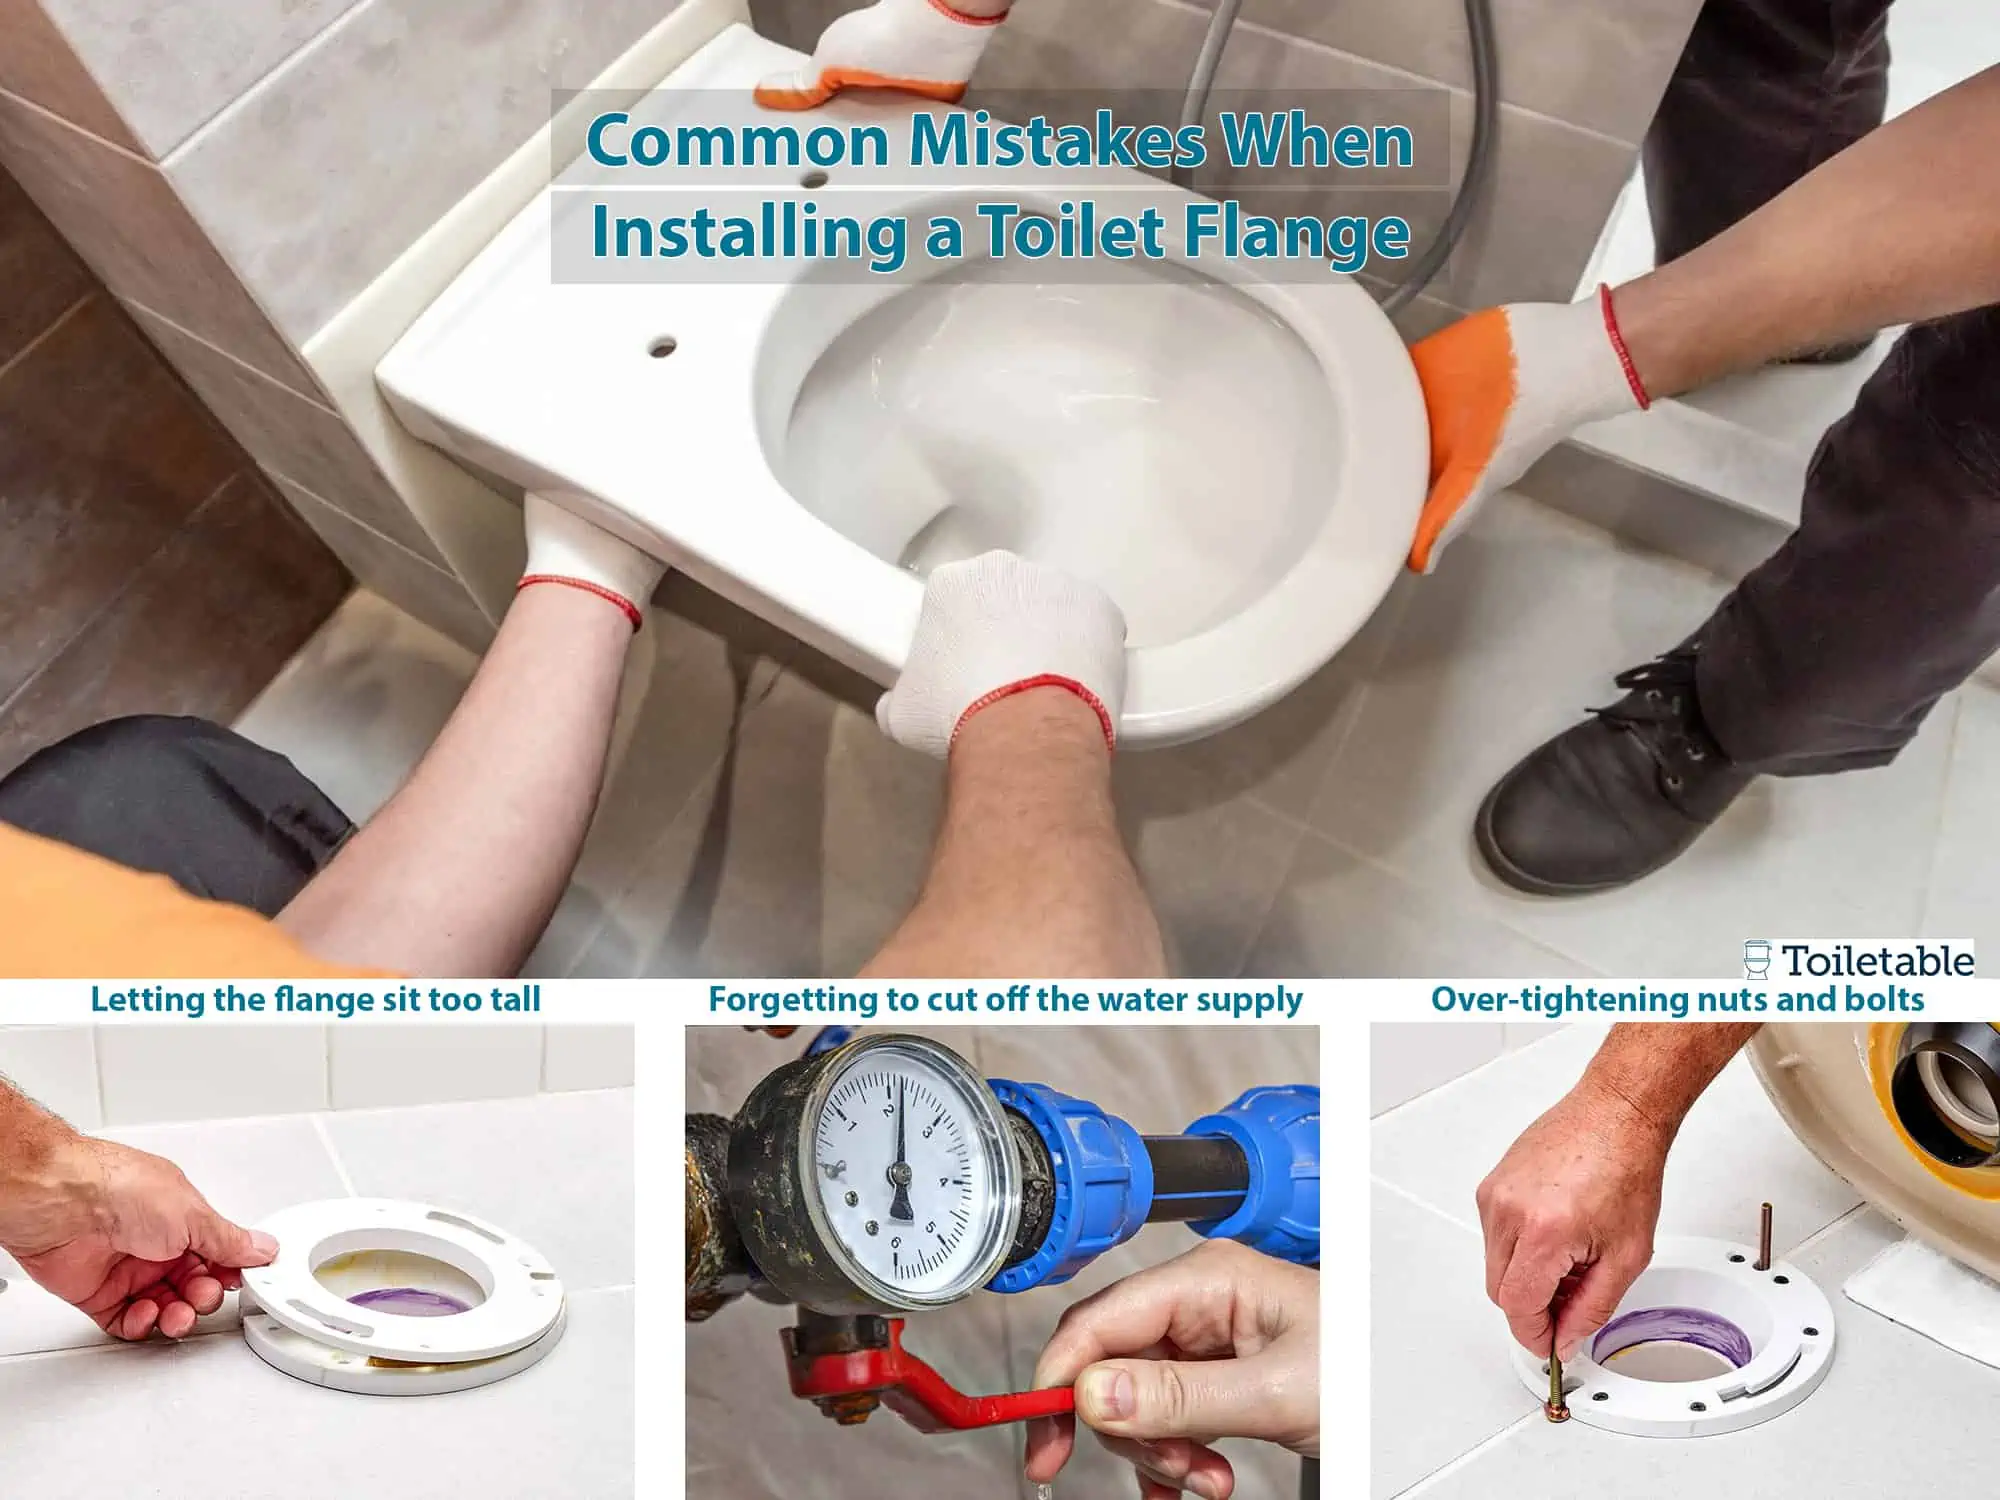
  • Letting the flange sit too tall. In theory, you can install the toilet with a high sitting flange. However, a too-tall flange comes with the risk of breaking in the long run. By installing the flange at a safe height, you will avoid the risk of your flange breaking and will prevent the additional costs of calling the plumber in the future.
  • Forgetting to cut off the water supply. People often forget to cut off the water supply to the toilet when installing a new flange, which can lead to a big mess. Ultimately, shutting off the water supply is one of the most essential steps when installing a new flange or a new toilet in a basement, due to water drainage limitations. Furthermore, when you cut off the water supply, make sure to flush the toilet to drain any remaining water. Without these steps, you’ll have a lot of water in your bathroom to deal with in addition to the actual flange installation.
  • Over-tightening nuts and bolts. Although you want to make sure that all the nuts and bolts are tightened enough, over-tightening them can lead to breaking and cracking, which leads to additional costs. Therefore, go slow while tightening everything to safely secure the parts without any unintended damage.

Our Final Opinion

As you can see, installing a new flange is not difficult. However, since it’s going to be messy, it’s essential to cover the floor before installation. Also, make sure to gather all the necessary tools before the installation so you don’t have to stop midway through to grab anything. Finally, always remember to shut off the water supply before beginning the process, and you’ll have a new flange installed quickly and easily!

Category iconDIY Toilet Repair,  Installations

Primary Sidebar

Recent Posts

  • One-Piece Toilets with Seamless Design | 10 Reviews
  • Powerful Flushing Toilets (12 Strongest Flush) Reviews
  • Elongated Toilet Review ( 6 Favorites) Oval Bowl
  • The BEST Elongated Toilet Review (Oval Bowl) Toiletable
  • WaterSense Toilet Review (6 Save Water Saving Toilets)

Footer

Logo of "Toiletable" with an illustration of a toilet and a sparkling star on the tank.

Guides and resources for your toilet needs.

DIY plumbing skills for homeowners.

Toiletable.com | All Rights Reserved

Company Information

  • About Us
  • Contact Us
  • Affiliate Disclaimer
  • Privacy Policy

[email protected]

Toilet Guides

  • Fix & Repair
  • Cleaning Tips
  • Clogs
  • Installation
  • Measuring
  • Water Saving
  • History
  • Comparisons