If you’re having  toilet troubles , you’ve come to the right place. Toiletable is a leading expert in all things toilets – from the good, to the inevitable bad. Our tips and guides answer any questions you may have regarding toilet installation, maintenance, and remedies.


★ Clogs Category

★ Fix & Repair Category


★ Cleaning Tips Category

★ Installation Category


★ Measuring Category

Though it may seem rather straightforward, measuring toilet parts tends to be a bit more difficult in practice when you don’t know what you’re looking for. Our guides identify the different parts of the toilet and how to accurately measure them.

When you’re looking for a new part, precise measurements are crucial to make sure you’re getting the right one – the first time around.


How-To and Fix-It Guides (DIY)

Our goal is to provide you with a variety of  fix-it and how-to guides  for everything about your toilet. We not only show you how to install a toilet, but we even show you how to unclog one. Read our below articles and teach yourself how to become a “Do It Yourself” expert.


Cleaning a Toilet the RIGHT Way

It’s spring! You know what that means – time to embark on spring cleaning.

But, we all have that one not-so-fun task on the spring cleaning to-do list, right?

→ Clean the toilet.

We know it can be a difficult one to check off.

You don’t want to get all of the cleaning supplies out, so you put it off. You don’t want to put on those rubber gloves, so you put it off. You don’t want to wear a mask, so you put it off. Well, we are here to tell you, it’s a lot easier than you may think using our cleaning tip guides.

Toilet Cleaning Supplies

Organizing your Supplies

The first thing to do to prepare for an easy toilet cleaning experience is to make yourself a toilet cleaning kit.

Put it all in one place! It takes away all your extra steps and leaves you with a one stop shop for all of your cleaning needs.

My family has always had a bucket that lives in the closet where we keep all of our bathroom cleaning supplies.

We call it the bathroom bucket, and it is invaluable.

Creating a Bathroom Cleaning Bucket

Here is a checklist for the tools you need to supply your bathroom bucket. Print it out and use it for yourself on your next shopping trip!

  • A bucket with a handle (choose a fun color to brighten your chore day!)
  • One pair of elbow length rubber gloves
  • A FFP2 disposable respirator face mask
  • Paper towels
  • One pack of hand sponges
  • Glass cleaner
  • All purpose surface cleaner
  • Toilet bowl cleaner
  • Disinfecting wipes
  • Toilet brush
  • Squeegee

Pick up all your supplies at your local store for a one stop shop! Many of these supplies can double in other rooms around your house, too.

Keeping Supplies Clean

Make sure you are wiping down your supplies after use!

You are handling these items with your rubber gloves that are also touching the germs and bacteria on your toilet.

Take your disinfecting wipes and wipe down the body and sprayers of all your cleaning agents.

Then remember to thoroughly wash your hands before touching your face or moving on to another chore.

How to Properly Clean a Toilet

Cleaning a toilet is easy and quick, but should be done thoroughly. Follow these steps to properly clean your toilets at home.

  1. Put on your gloves and face mask – keep yourself protected from those cleaning chemicals!
  2. Pour your toilet cleaner around the inside of your toilet bowl. We recommend you let it soak for about 5 minutes.
  3. While your bowl cleaner is soaking, wipe the whole toilet down with disinfecting wipes. This will get any extra germy gunk off the toilet before you go in with your cleaning spray and hand sponge.
  4. Next, spray all the nooks and crannies with your all purpose surface cleaner.
  5. Use your hand sponge to scrub down the exterior of your toilet. Make sure to get into the crevices underneath and behind the toilet seat and lid!
  6. Then, take your toilet brush and scrub down the inside of your toilet bowl.
  7. Rinse your brush and flush!

Your toilet is now scrubbed and clean, ready for use.

Removing Hard Water Rings and Stains

Hard water stains come from water with extra sediment in it.

When it sits in your bowl, the minerals and sediment build up and stain the porcelain.

If your toilet bowl still has hard water rings and stains around the rim, try these tactics.

  1. Try adding a mixture of 2 cups vinegar to 1 cup baking soda. The water will fizz up, but let it sit for around 10 minutes. Scrub with your toilet brush, then let it sit again for another 20-30. Then flush! Watch the vinegar work its magic.
  2. If just plain vinegar and baking soda doesn’t work, try vinegar and Borax (a cleaning agent, like a stronger version of baking soda!)
  3. If that still doesn’t work, do the same method again, but use a 0000-grade steel wool scrub. This is the finest steel wool you can get, and should prevent scratches to your toilet bowl.

How Often Should I Clean My Toilet?

You should aim to thoroughly clean your toilets once a week, and more often if you live in an environment in which bugs and rodents find their way into your home.

Bathrooms are the perfect host for bacteria such as E.Coli and other germs to grow and spread.

Our toilets are usually very close to our sinks, bathtubs, and other products we use for our personal hygiene.

Keeping your toilet clean better keeps the rest of your bathroom clean, which, of course, keeps you clean!

Pro Tip:  Make sure you are closing your toilet lid before you flush! Keeping it open can spray bacteria around to your whole bathroom, giving them more places to hide and grow.

Our Suggested Methods and Supplies

Here is a list of the supplies we recommend!

  • Windex: An excellent multi-purpose glass and window cleaner, always a staple in any household!
  • Kaboom Mold & Mildew: Excellent for ridding yourself of those hard to reach corners.
    • Mr. Clean Scrubbing Sponges: All in one erasers for in between those bathroom tiles.
  • Drain Snake: Recommended for any bathroom of humans who have hair! Indispensable to the smooth running of your drains.
  • White Vinegar Mixtures: Budget-friendly and effective!

Natural Cleaning Approach

We understand! Sometimes all those harsh chemicals are not what you want in your home, or sometimes you may be allergic.

If you prefer natural cleaning mehods, here are some recipes we recommend.

  • DIY Countertop Cleaner: Take an empty spray bottle and pour in 1 cup baking soda, ½ cup white vinegar, ½ cup dish soap, and 1 cup of water. Shake it up and spray away!
  • DIY Tile Cleaner: Easy as pie, just take a bucket of warm water and measure 2 parts water to 1 part baking soda. Let the baking soda foam up, then take a scrubbing brush to your tile surfaces.
  • Natural Soap Scum Removal: Did you know you can remove soap scum with the aid of acidic fruit? If you have something like a grapefruit hanging around your house, cut it in half, pour on some salt, then rub it over any soap scum you see in your shower. Then wipe down with a paper towel.

We hope this has been a helpful guide, and happy spring cleaning!

Toilet Cleaning Special Recipe (DIY Guide 2023)

Why waste your holidays scrubbing your toilet when you have homemade toilet cleaning mixture in hand? Made of all-natural ingredients, homemade toilet cleaners are non-toxic and environmentally friendly.

The easiest homemade toilet cleaning mixture DIY method is to mix baking soda with citric acid and spray just a little amount of water into this mixture. After that, you can keep the mixture in a mold and leave it overnight to harden. Whenever you need to clean your toilet, toss a ‘cleaning mixture’ and see the magic!

If you want to learn the proper way of making a toilet cleaning mixture at home, we are here to help. Let’s dive deep into the details and find out how it works.

Key Takeaways

  • Toilet cleaning mixture are made of household ingredients like citric acid, baking soda, cornstarch, dish soap, hydrogen peroxide, and essential oils.
  • Mix citric acid and baking soda first add some dish soap. Spray some water until the mixture feels like damp sand. Put the mixture in silicone molds and wait for a day until it hardens.
  • Drop one cleaning mixture at a time on your toilet bowl. It will burst and fizz as the ingredients spread on the surface. After a few seconds, flush your toilet and it will be all clean and fresh!

What are Toilet-Cleaning Mixtures?

As the name suggests, toilet cleaning mixtures contain natural cleaning agents for clearing stains and removing bacteria from your toilet bowl. The cleaning mixtures is made by molding ingredients like citric acid, baking soda, essential oils, dish soap, cornstarch, or hydrogen peroxide.

When you drop one of these cleaning mixtures in your toilet bowl, they burst and fizz which cleans the toilet and pipes leaving behind a nice scent of essential oils.

How Do Toilet Cleaning Mixtures Work?

The main purpose of toilet cleaning mixtures is meant to deodorize the toilet and remove stains. They include two key ingredients: citric acid and baking soda.

Citric acid is a mild acid naturally found in lemon. It can be used to remove hard water stains, light escaping, clean mineral deposits, dirt, and grim. Citric acid binds to the mineral or dirt atoms and prevents them from redepositing on the surface. Besides, this ingredient can effectively fight against viruses and bacteria.

Baking soda dissolves any kind of dirt, grime, or grease that might be on your toilet bowl. It contains hydrogen ions which neutralize different types of acidic and alkaline odors. This way, your toilet becomes clean and fresh without any scratches.

Essential oils are also used to freshen the toilet environment with their sweet smell. You can also use borax or hydrogen peroxide. Both these ingredients remove stains and dirt while fighting harmful germs as well.

Make Homemade Toilet Cleaning Mixtures – 3 DIY recipes

Now it’s time to learn how to make your very own toilet-cleaning mixtures with household ingredients. We will discuss three easy methods so that you can pick the ingredients you prefer.

Method One – Preparation with Baking Soda, Citrus Acid, and Dish Soap

  • You’ll need one-fourth cup or 75g of citric acid and one cup or 180g of baking soda for this recipe. Mix the two dry ingredients with a spoon.
  • Now, take one tablespoon or 15mm liquid dish soap and mix it with the dry ingredients. It’s better to choose a mild dish soap that’s not foamy. Stir until the mixture reaches a damp sand-like texture. Spray some water if it looks too dry.
  • Take a silicone mold of any size and shape. You can also use the plastic icing mold of your refrigerator. Use a spoon to put the mixture into the mold. If you’re using your hands, be sure to wear your gloves.
  • Leave the mixture for drying overnight. It only takes 6 to 10 hours to fully dry. However, it’s better if you can wait for 24 hours. The moisture will evaporate during this time and the mixture will harden to form small cleaning tablets.

Pro Tip: If the mixture is too damp, the ingredients won’t stick or become hard. In this case, place the clumped mixture on parchment paper or a baking sheet and keep it in an open area for 3 to 4 days. If the mixture is too dry, spray some water to make things work. Once dried, store the cleaning mixtures in an airtight container.

Method Two – Preparation with Baking Soda, Citrus Acid, and Cornstarch

  • Take a small bowl and mix a half cup or 150g of citric acid, a half cup or 90g of baking soda, and half cup or 204g of cornstarch. You can use a half cup of borax instead of cornstarch. Stir all the dry ingredients together with a spoon.
  • You can add essential oils to the mixture to freshen up your toilet after each cleaning session. Lavender, lemon, tea tree, orange, etc., are some popular choices. Use whatever you like and mix different scents to add a twist. Use a dropper to mix 25 drops of essential oil with the dry ingredients.
  • Now, wear your gloves and take some water in a spray bottle. Spray the water 2-3 times into the mixture and knead it using your hands. Don’t spray too much water at a time as it will make the mixture fizz and it won’t work anymore.
  • Squeeze the damp mixture so that the ingredients clump together. Put the ingredients in a plastic or silicone mold and leave it to dry for 4 to 10 hours.

Method Three – Preparation with Baking Soda, Citrus Acid, and Hydrogen Peroxide

  • For this recipe, you’ll need one-fourth cup of citric acid (75g) and one cup of baking soda (180g). Mix the ingredients and proceed to the next step.
  • Now it’s time to prepare the hydrogen peroxide solution. Take a spray bottle and pour a half tablespoon of white vinegar into one tablespoon of hydrogen peroxide. Shake the bottle to properly mix the wet ingredients.
  • Spray the hydrogen peroxide solution 2-3 times with the dry ingredients. Wear gloves to squeeze and clump the ingredients. Keep aside a small amount of hydrogen peroxide solution for later use. Add 15-20 drops of essential oil if you want. Again, don’t make the mixture too damp.
  • Use a deep spoon to pack the mixture. Remove the excess and press the mixture a bit to give it a domed shape. Tap the mixture on parchment paper or a baking sheet. Leave it to dry for 4-6 hours.
  • Occasionally spray the remaining hydrogen peroxide solution, but only a small amount of it. Once the cleaning mixtures become hard, you can store them in an airtight glass jar.

How to Use Toilet Cleaning Mixtures?

Once the cleaning mixtures are hardened, the rest of the process is easy. You pop them from the mold and toss one inside your toilet bowl. When the cleaning mixture comes in contact with water, it bursts, fizzes, and bubbles. Wait for a few moments until the fizzing stops.

You can use a brush to clean the stubborn stains and dirt. Once done, flush the toilet and enjoy the fresh scent of your clean toilet.

Wrapping Up!

So, that was all about homemade toilet cleaning mixtures DIY. As you can see, it’s super easy to make these cleaning mixtures with our given instructions. If you want deep cleaning, use hydrogen peroxide for better results. To enjoy long-lasting scents of different essential oils, mix them up in equal amounts. Be careful with the amount of moisture and the cleaning mixtures should be ready without any issues.

Basement Install Toilet Guide

basement toilet install

Installing a toilet in your basement is an excellent way to maximize your living space. It can transform your ground floor from a drab storage area into another full story of entertainment. 

Placing a restroom on the ground floor isn’t necessarily difficult, especially if you already have a sewage system and main water supply (as most homes do). However, when the main line is above the basement level, homeowners can run into issues when placing a toilet on the ground floor. 

In 1665, Isaac Newton discovered gravity. If you attempt to install a toilet below the main water line of your home, Newton’s discovery may cause you quite a bit of hassle. When you flush a toilet on any other level of your home, gravity helps move the waste into sewage. However, when this line is above your new basement restroom, gravity will work against you. 

Never fear; there are ample solutions to install a fully functioning toilet below the main water line of your home. Let’s get creative and expand your home living space to the ground floor. 

Pro Tip: Only attempt this project if you have some DIY experience and the proper tools. If not, a plumber is just a phone call away. 

Issues with a Basement Toilet Install

Pipe Issues

Sometimes, the main water line of your home may not be located in your basement. This can make it excessively difficult to install a toilet and may cause you to want to give up on the process entirely. Don’t do that – there are plenty of unique solutions like upflush toilets and composting options that our bathroom experts know all about. 

Concrete Issues

We know, breaking concrete basement floors can be quite an ordeal. It often requires more than one person and a skill level well beyond the basics. To install a basement toilet, breaking concrete is often necessary to access drain lines. This goes above and beyond your average DIY project and definitely should not be done by beginner home improvers. 

The Basics (Installation)

Install Step 1: Locating Rough-in and Plumbing

The first step to installing a toilet is locating the rough-in and plumbing connections. In most cases, the rough-in will be between 10 and 14 inches from the wall, which makes it easy to find. If you are not versed in toilet talk, a rough-in is where plumbing lines enter a house, but final connections have not yet been made. This is where you will connect your new toilet lines to. 

You must also find the water supply pipes. They tend to be located around nine inches above the floor, usually behind the drain. In some cases, a flange will already be installed, but it could be installed too high or too low. Especially in older homes, locating these important lines may be tricky. 

If you’re getting frustrated trying to find the rough-in lines, this video can help provide some clear direction. 

Pro Tip:  If the lines are installed too high, you can simply cut them down and add a new flange. If it’s installed too low, you will need a flange extender, which you can find at a relatively low price in most hardware stores. Fixing issues does not have to cause stress!

Install Step 2: Preparation

The golden rule of plumbing work: always turn off your home’s water supply before getting started. Unless you want to get doused in water and potentially flood a room or two in your home, that is. 

Pro Tip: Some homes require the utility company itself to cut off their water line. Check with your provider to see if you can do it yourself or not. 

Install  Step 3: The Toilet Flange

A flange is a pipe that mounts a toilet to the ground and connects it to the drain pipe. When installing the flange, the first thing you must do is inspect the drain pipe. A drain pipe comes in many shapes and forms. It may be metal, ABS, or another material entirely. Whatever you do, make sure the flange is made from the same material to avoid a toilet disaster. 

If your drain pipe is not at floor level, you need to cut it down. Once you do this, remove the cap with a hammer. 

Pro Tip: Toilet drains don’t smell like a bouquet of roses. Stuff it with a cloth to avoid a foul smell wafting around during installation. 

All toilet flanges have four holes. You will need to ensure that two of the four holes are at the same distance from the wall so that the toilet can sit straight. With a hand drill, prepare the holes in the flange, and then use the hammer drill to make holes in the floor. Clean the drainpipe and the flange with fine sandpaper and add adhesive to both ends. 

Pro Tip: Make sure to buy the proper adhesive based on your flange and drainpipe material.

Next, insert the flange, ensuring it has enough adhesive applied. Fix the flange to the ground using concrete screws, and your flange is installed!

Install Step 4: The Shutoff Valve

Installing the shutoff valve is pretty simple – similar to the flange, you’ll start by turning off your water supply. Once you do this, cut the end of the pipe and de-burr the rough end with sandpaper. Slide the compression nut onto the pipe. Make sure that it goes as far as possible. 

Once the compression ring is in the correct position, ensure that it fits properly, and then attach the compression valve over the ring. Finally, tighten the compression nut and inspect it to ensure that nothing leaks. If everything is fine, that’s it – you have successfully installed the shutoff valve.

Install Step 5: The Toilet

Pro Tip: It’s a good idea to have someone help out with this step. Toilets are a two-person job!

To start installing your new basement toilet, install the closet bolts. If you have any plastic clips to hold the bolts in place, add them as well. After this, install the flange seal. Be careful here – you can use wax for the seal, but if there is no one around to help you out, it’s better to use a seal with no wax. Put the tank in the proper position, and make sure that you lift it over the closet bolts. 

Pro Tip: Install the bowl first and then the tank.

Screw the nuts onto the toilet bolts carefully. If you tighten them too much, you might break the bowl. Then, connect the water supply somewhere between the shutoff valve and the fill valve and turn on the water. Inspect for any possible leaks. If everything is fine, your toilet is ready for use!

Install Step 6: Covering Exposed Pipes

So you just installed your stunning new toilet, but unsightly exposed pipes are now lining your restroom. Never fear, there are three methods to solve this problem.

Method 1: Cover the pipes with fabric or decorative tape. This is the easiest and least involved method. It is perfect for those who don’t mind the retro look of exposed pipes and want an art project instead of something more tedious. 

Method 2: Paint the pipes to match the bathroom color, or paint them with an accent color to add a unique look to your bathroom. We believe that this is the best method to use. It gives pipes a clean look without having to break out the construction tools. 

Method 3: Hide the pipes by building a box to cover them.

Note: Depending on your municipality, you might also need to install a fan in your bathroom. A fan is a great way to control moisture and avoid bad smells in your bathroom, so we recommend doing this anyway. 

Basement Toilet Solutions

In some cases, the drain line will be above your ground floor. This can make installing a basement toilet difficult. In even more cases, you may not have the skillset, manpower, or time to break concrete and access drain lines in your basement. Don’t stress. There are ample solutions to get that basement toilet anyway. 

Solution 1: An Upflush Toilet

We believe that an Upflush toilet is the best solution for anyone looking to install a toilet anywhere in their house, hassle-free. Upflush toilets have the same features and usage of regular toilets. The only difference is where the waste goes when you flush. 

While typical toilets use gravity to send waste off into sewage, an upflush toilet has a special pump behind it with the purpose of waste disposal. It takes up so little space that bathroom visitors may not even notice the difference between this and a commonly installed toilet. 

When an upflush toilet is flushed, the waste is ground down using a macerator and then fully disposed of, making it empty for the following toilet user. 

Installing an Upflush Toilet

Installing an Upflush toilet is a much easier process than standard toilet installation. Simply drill the macerator into the floor, plug it into an outlet, connect drainage to rough-in lines using PVC piping, and attach the drainage from the toilet to the macerator using a hose clamp. Attach free air vents, slip the discharge tube into the macerator pump, and position the upflush toilet. 

Pro Tip: Zip ties can help keep the drain connecting the toilet to the pump in place. 

Solution 2: A Composting Toilet

Composting toilets are completely dry, meaning you do not need to connect them to plumbing at all. They simply compost human waste in a low cost, low maintenance manner. Assembly takes seconds. All you need to do is slide the pieces of the toilet together and add a carbon additive to digest the waste. 

Composting toilets do not create sewage (or a biohazard) as they separate liquids from solids. Believe it or not, these toilets do not smell (this is a common misconception). Waste goes into a secure chamber with a closeable lid. You also only need to empty them every few months, the composting process does most of the hard work for you. 

Frequently Asked Questions

Do I Need a Special Toilet for My Basement?

Not exactly. However, as you can see, the installation process can be quite different than when installing a toilet in another place in the house. This is helpful to keep in mind when picking out your toilet. If you do not want to (or cannot) go through the normal toilet installation process, invest in an upflush or composting toilet. 

What Is the Total Cost of Adding a Toilet to the Basement?

The average price for installing the toilet in your basement is around $1,500. However, the price can greatly differ depending on the model you want to install and if you wish to do it by yourself or call the plumber. In some cases, the cost could go over $2,000.

Is there a way to Install the Toilet in a Basement without Breaking Concrete?

If you don’t want to break the concrete, you can install an upflush toilet or composting toilet. Both of these options require minimal installation and are great options for a low hassle job. 

Bottom Line

Adding a toilet to your basement isn’t difficult. Make sure that you have all the right tools and an extra set of hands. As long as you carefully follow the installation guidelines for your toilet, you should have your new toilet installed in no time!

Replacing a Toilet Fill Valve Guide of 2023

toilet top view

If you have a leaky toilet, chances are the fill valve is faulty. Toilet fill valves are designed to prevent water from running when the tank is empty. If your tank is full, the float ball does not float up and water flows out of the overflow tube.

When the tank gets low on water, the float ball rises and cuts off the supply of water to the bowl. It’s easy to replace a fill valve yourself in just a few minutes. You don’t even need many tools..just a screwdriver and wrench or pliers will do.

Toilet Fill Valve Replacement (Step-by-Step Guide)

Step 1 – Turn Water Off

The first thing you need to do is to turn off the water supply to the toilet at the shutoff valve under the sink. If there isn’t one, turn off the main water supply for your home. The shutoff valve is typically located on an exterior wall of your house, but it might be inside near where the supply line enters your home.

Step 2 – Remove Tank from Bowl

Next, unscrew each of the bolts holding together the tank and bowl with an adjustable wrench or pliers. There will be about four bolts in all – two at each side of the tank’s base flange and two more holding down the overflow tube inside of the tank itself. These bolts may be corroded, so be cautious when removing them.

Step 3 – Disconnect Water Supply Tube

Turn off the water supply to the toilet by turning off its shutoff valve. The valve is usually located on a pipe just outside of the wall or floor where it enters your home. If you can’t find this shutoff valve, check inside your basement for an access panel that covers plumbing for all of your bathrooms.

Step 4 – Remove Tank lid and Set Aside

open toilet tank against a blue wall

Remove the old valve by unscrewing it counterclockwise. If that doesn’t work, try loosening it with pliers to break its seal.

In some cases, you may have to remove other parts of the tank before you can access the fill valve. It’s important to take apart only as much as you need to in order to avoid unnecessary damage or leaks.

The old valve will probably be attached with a large nut or bolt on top of the tank, so you’ll need an adjustable wrench or socket wrench in order to get it loose. Once you’ve removed the old valve, set it aside so that you don’t accidentally drop it inside the tank while installing your new one.

Step 5 – Disconnect Fill Hose from Overflow Tube (Bottom of Bowl)

Remove any screws holding down the old fill valve so that you can pull up on it. If there are no screws holding down your old fill valve or mounting bracket, remove them by hand instead. Then disconnect your old fill hose from underneath your overflow tube inside your bowl by pulling on it hard enough so that it bends slightly outwards away from where it connects with your new valve inside.

Step 6 – Loosen Nut Connecting Flapper Rod (Use a Wrench)

Ball-and-arm toilet float in white background

The flapper is a rubber or plastic disk that fits over a hole in the bottom of the tank and allows water to enter when you flush. It’s attached to a metal rod that protrudes from one end of the tank’s interior.

Water flows into this hole from below, filling up the tank and causing it to float up to open another hole at its top end. This hole lets water out of the tank into your toilet bowl when you flush.

You want to use a wrench to loosen the nut that connects the flapper to its rod.

Step 7 – Thoroughly Clean Area Before Installing the New Flapper 

Cylinder toilet float in white background You don’t want dirt or grime getting into the inner workings of your toilet, so make sure that everything around where you will be working is clean and dry before installing a new flapper.

Step 8 – Insert New Flapper into Same Hole

Once you’ve removed the old fill valve, and cleaned up any debris with a rag or paper towel, you want to insert a new flapper into position through that same hole in your toilet tank usually located just below where you removed your old fill valve.

Make sure that it fits securely over its seat inside of your tank before installing it onto its mounting nut or bolt at this point. You may need to attach one end of a chain which should be included with most new fill valves onto this flapper before proceeding with the installation.

Replacing Tips – New Toilet Fill Valve

Replacing a toilet fill valve can be a quick and easy job if you know what to look for. Here are four tips to help make your next toilet repair a success.

  1. Before you begin, make sure that all of the water is drained from the tank. You can do this by flushing the toilet and opening the drain valve at the bottom of the tank or by removing a cleanout plug if your toilet has one.
  2. Use a flashlight to locate and disconnect any wires attached to your old fill valve. There should be two small wires going into the fill valve in addition to a larger black wire that connects to the float itself. If you don’t see these wires, skip this step because they may not be present on your brand of fill valve.
  3. Unscrew or pry off the top cover of your old fill valve with a screwdriver or putty knife if it’s held in place with clips or screws depending on the model. Remove any nuts or retaining rings holding it together if necessary.
  4. Look inside for any plastic parts that might need replacing; if so, remove them now and set them aside. Make sure there are no broken pieces inside that could leak later on down the road!

Final Thoughts

Toilet fill valves are the heart of your toilet. When a fill valve is damaged, it can cause your toilet to leak or not flush properly. Replacing a fill valve is an easy plumbing task that can be done in less than an hour especially if you follow the aforementioned steps.

Adjusting a Toilet Float Walkthrough

An arm fixing a toilet float

If your toilet constantly has either too much water or too little to flush, chances are that there’s an issue with the toilet float.

A loose float will allow in too much water which can lead to leakages; though this may not seem severe, studies show a leaky toilet can easily waste up to 200 gallons of water per day.

Learning how to adjust a toilet float is extremely important in order to prevent further water wastage and potential clogs down the road.
Take a look at our instructional guide to toilet floats to better understand how to tackle these issues.

Determine a Toilet Float Problem


Prior to attempting to fix your toilet float, it is important to determine if it really is the problem in the first place.

Look out for continuously running water and a higher-than-usual water level. Conversely, another sign that your toilet float is having issues is when there’s too little water in the bowl.

Once you have diagnosed the problem, it’s time to proceed.

Adjustments of a Toilet Float – The Procedure for Ball-And-Arm Floats


Step 1 – Stop the Water Supply

Shut the further water supply to the toilet before you begin the adjustment. This will help you prevent further spillages and accidents.

Step 2 – Check the Current Water Level

With the water supply stopped, begin by checking the water level in the toilet. The ideal water level sits approximately one to two inches below the overflow tube.

Step 3 – Flush the Toilet

Now that you have an idea where your toilet’s water level currently sits, you’ll need to go ahead and flush to empty it.

Step 4 – Check the Toilet Float

Inspect each and every part of the float mechanism, including the plastic ball. Look out for any signs of damage, such as the float having water inside of it or the plastic ball being broken.

In such cases, your best bet is to have the entire toilet float replaced rather than adjusted.

Step 5 – Adjust the Level with a Screwdriver

How you adjust your toilet’s float will depend on whether you want the water level to rise or be lowered.

If the water level is too low, this means that the float’s screw is too tight and needs to be loosened up.

If the water level is too high, then the float screw will need to be re-tightened.

You can tighten or loosen it by turning either clockwise or counter clockwise. Just be careful not to overdo it. Too much rotation to either side might create new problems.

Generally, how much you tighten or loosen the system should be based on how bad the problem was. A slight overflow, for instance, can be resolved with half a turn. A major overflow can typically be resolved with a full rotation or two.

Step 6 – Check if Everything Sits Right

Once you’re done adjusting the level using a screwdriver, it’s time to confirm if the water level sits right. You’ll need to re-open your toilet’s water supply and allow for 60 to 120 seconds for it to fill up.

Once the in-flow stops, carry out a physical examination to see if the level is one to two inches below the overflow tube.

If the level is still too below this mark, you’ll want to loosen the system by turning it for another half-turn or so until you achieve the ideal level.

However, if the level is too high, you’ll need to flush the toilet and repeat the process all over again beginning with an empty toilet.

Adjustments of a Cylinder Toilet Float

The first two steps of adjusting a toilet float in a cylinder toilet are similar to those of the ball-and-arm float.

Step 1 – Stop the Water Supply

Shut the further water supply to the toilet before you begin the adjustment. This will help you prevent further spillages and accidents.

Step 2 – Check the Current Water Level

With the water supply stopped, begin by checking the water level in the toilet. The ideal water level sits approximately one to two inches below the overflow tube.

Step 3 – Lookout for the Adjustment Stem

Look out for a tiny tube either dangling horizontally from the top or running parallel to your toilet’s fill valve.

On it, you’ll need to identify a special clip.

Step 4 – Adjusting the Clip

Squeeze (or release) the clip and move it either way depending on how you want to adjust the height. You can raise it to increase the water level or lower it to prevent an overflow.

While keeping your float by half-inch, use your fingers to firmly keep the dial against the edge of the stem.

While at it, keep a full rotation by either rotating the stem clockwise or counter clockwise.

Step 5 – Confirm the Results

Turn the water back on and leave it to flow for at least two minutes. Check the water level and confirm that it sits within the ideal level.

If not, flush the toilet and repeat the process.

Final Thoughts

It is important to learn how to adjust toilet floats so you can do this on your own at home. By doing so, you can save yourself time and money – while also preventing further leakages and keeping your toilet in a top-notch condition.

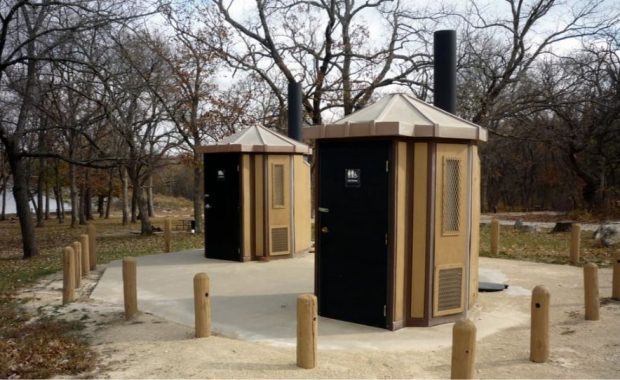
Vault Toilet Guide (Fully Explained)

vault toilet guide

Vault toilets are much different from standard flush toilets. These toilets are non-flush, use no water, and store all waste in a large airtight
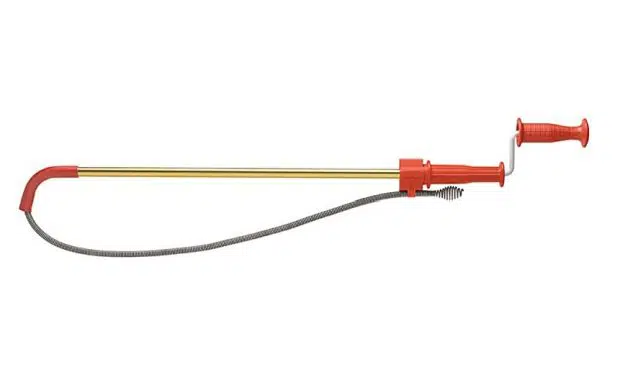
 vault.

You’ll most commonly find vault toilets installed in recreational areas, parks, campgrounds, and other places where water is not accessible. A huge upside to vault toilets is the reduction in water consumption.

Not only that, but these toilets also help reduce environmental pollution. Let’s go into some details about vault toilets.

understanding valut toilets

How a Vault Toilet Works

Although they might sound complicated, vault toilets are quite simple to use and understand. Basically, the toilet connects to an external vault underground. These vaults can usually store up to a thousand gallons of waste. What’s more, there are vaults capable of storing as much as 12,000 gallons of waste. Still, the capacity of a vault depends on the intended use and design. Once the vault is full, the municipal council or another group that installed the toilet will pump out all the waste. Because they can hold so much waste, the vaults don’t require pumping too often. In most cases, twice a month will suffice.

From a user’s perspective, vault toilets are not too different from other types of toilets. The user will still have a toilet seat to sit on, but they won’t need to flush waste away as it will go directly into the vault.

Advantages

  • Privacy – These self-contained toilets always come in single units. Therefore, only one person can use it at a time. The single-use stall ensures great privacy.
  • Convenience – Vault toilets offer a way to use the bathroom even in spaces without plumbing access. For example, vault toilets are often available in most recreational centers and parks, making sure everyone has access while enjoying their time outdoors
  • Portability – Typically these toilets are made out of plastic, so they are portable and can be transported to different locations. This feature can really come in handy at various events where you may only need the toilet for a few days
  • Cost-effective – As they don’t require water, there is no flushing when using a vault toilet. Because you won’t have to install running water to use this type of toilet, they often cost much less compared to more permanent bathroom options

Disadvantages

  • Outdoor Elements – Typically installed in outdoor settings, these toilets can offer a varying user experience that depends on the weather and other outdoor elements. For example, the bathroom could get very warm if it’s a very sunny day. There’s also a small risk of bugs or other creatures finding a way to enter the stall
  • Movement – Although plastic vault models are very movable, the ones that are not made out of plastic are impossible to move around without a lot of equipment
  • Sanitation – As these toilets don’t use water, they require constant maintenance and cleaning. They’re also not as pleasant to use compared to other bathrooms with running water and electricity

How To Properly Maintain A Vault Toilet

maintaining a vault toilet

As these toilets are waterless, they are prone to developing bacteria and other disease-causing organisms. Therefore, if not emptied and sanitized regularly, they become an ideal territory for microbes to multiply. To ensure a vault toilet is clean and bacteria-free, it must be emptied periodically and disinfected with septic treatment products. Including hand sanitizer in the toilet area is also an easy way to help keep the stall space more hygienic as well.

Bottom Line

Due to their design, vault toilets are economically advantageous and even environmentally friendly. As most of are ADA-compliant, they are also considered safe for use by everyone. Furthermore, they are quite easy to maintain, extremely durable, and cost-effective. Especially for parks, campsites, and other outdoor spaces, a vault toilet is a huge convenience for everyone enjoying the great outdoors.

Using a Toilet Snake for Stubborn Clog Guide

use a toilet snack

There’s no feeling quite like watching the water-level rise ominously in the toilet bowl. Often unhygienic, messy, and even embarrassing, a blocked drain is a problem you want to solve ASAP.

And since you’re reading this article, we can guess that’s exactly why you’re here. Not to worry! Sometimes a stubborn clog just seems immovable no matter the amount of plunging and chemical pouring. This is when we recommend a more involved approach. And the best part?

You can do it completely on your own, no plumber necessary. You just need a little help from the toilet snake.

A Toilet Snake Explained

Not all pipes are the same, and toilet snakes are specifically designed to be used in toilet systems by either grabbing or breaking through the congested material to help loosen the blockage.

If you’re looking to purchase a toilet snake, one feature to look out for is the coating on the metal shaft of the tool. Unlike other drain snakes, toilet snakes have a distinctive protective rubber coating over the shaft to prevent scratching the toilet bowl. Toilet snakes also go by ‘toilet augers’ and ‘closet snakes’ but so long as you look for a well-made snake with a sturdy rubber coating then these aliases won’t confuse you!

Toilet snakes are a common tool readily available in most hardware stores and online. They’re generally quite affordable, so it’s easy to have a basic toilet snake on hand in case of emergency. However, if you do want to invest in a drain auger or another more powerful tool, be prepared to spend more.

Functions of a Toilet Snake

orange handle using a toilet snake in toilet

Your toilet’s drain, just like any other drain, is prone to clogging. Have a look under your sink; you’ll likely see the pipe that carries away waste, particularly noting the pipe’s bent shape. This crucial bend is referred to as the p-trap, and this shape is also integrated into the porcelain making up your toilet.

When your toilet works as expected, the force of the flush pushes all waste smoothly through this pipe. Everything you flush must go through this pipe, which is why larger objects can get stuck and prevent your toilet from draining properly.

The most common causes of toilet clogs include excessive toilet paper, waste, or any other object that’s unable to break down or too large to flow through the pipes.

If you are attempting to unclog your toilet, keep in mind that you’re basically trying to move the blockage material through the p-trap bend.  When blocked, you’ll need to manually jostle the waste and clear the blockage, which is where the toilet snake comes in handy.

Types of Toilet Snake

5 different types of toilet snakes shown in photo

Snakes vs. Augers

Augers and snakes? Snakes and augers are often confused for one another or lumped together as the same tool. True, they are two very similar drain-clearing tools, but they have important differences. There are various types and sizes of augers for different drain needs but all augers act in the same way – boring through a blockage, loosening and dispersing the waste, while snakes grab and pull the blockage out.

All of these options mean the toilet snake is not the only tool out there to unclog your toilet. However, the toilet snake is probably your best bet. Let’s take a look at exactly what these augers do to understand why we recommend the toilet snake:

Cable Auger

Also known as drain augers, cable augers are a good general auger to have in your home. You can use a cable auger on a sink or toilet; however, you risk scratching your toilet bowl on the uncovered metal rod. Cable augers have a corkscrew-shaped hook at the end of the cable which can be firmly twisted into the blockage and then used to haul it out.

Flat Tape Auger

Flat tape augers are similar to cable augers in how they work but the design is very different. Flat tape augers have a sharp tip and a more rigid flat cable instead of a hook and hose shape. The difference in design is because flat tape augers are very small and are only made for pipes with maximum diameter of 2 inches – a lot smaller than your toilet. In these small pipes, pushing is preferable to pulling, and the spear loosens and pushes the clog along the pipe to clear it.

Power Auger

Power augers are the alternative to manual augers like the cable auger. The power auger typically has a built-in motor or another power source which means you just have to feed the cable into the drain and let the auger do the rest. This is faster than a manual, but power augers are more expensive and more difficult for beginners to use.

Rocket Nozzle Auger

Rocket nozzle augers. The name alone gives it away, but these augers are pretty serious pieces of equipment. Not recommended for non-professionals, rocket nozzle augers are only used in commercial application and by licensed plumbers. Not to mention they’re much pricier than our other examples… We’re thinking that’s a little excessive just for a toilet.

Toilet Auger and Snake

Here it is. This is what you’ve been waiting for: the toilet snake.

We know now that all pipes aren’t the same. Cable augers scratch the porcelain, flat tape augers are too small, power augers are pricy, and rocket nozzle augers might destroy your toilet entirely. Toilet snakes are the perfect solution.

Toilet snakes are shorter than other augers to perfectly fit your pipes and come with a protective rubber coating over the metal rod to protect your bowl. The toilet snake either grabs or breaks through the pipe congestion, loosening it all. When a pipe is congested you can either break the blockage, push it through, or pull it back. Pushing a blockage is risky if you don’t know your pipe system or are inexperienced. Pulling the clog out is a guaranteed success – the obstruction travelled along the pipe to get there so you know it can fit back up. Designed to pull out, the toilet snake ensures that the obstruction is removed which makes them very beginner friendly.

How to Snake a Toilet (DIY Steps)

Snaking a toilet may sound intimidating but the process is actually quite simple. The only things you’ll need are a pair of rubber gloves and the toilet snake itself. But we don’t exactly recommend wearing your nicest outfit either.

Here are the five simple steps that you should follow (and a helpful YouTube video for a more visual explanation):

Step One: Insert the Toilet Snake

Take the toilet snake and insert the metal cable into the toilet bowl. Make sure that the snake goes all the way down into the drain.

Step Two: Turn the Toilet Snake

Crank the handle in a clockwise motion to push the cable deeper into the drain. Following the curve of the drain, keep cranking until the whole cable has made it through. If you feel the resistance of the clog, let the crank reset before continuing to turn. Repeat this as many times as necessary.

Step Three: Slowly Remove the Toilet Snake

Turn the handle counterclockwise to gradually retract the cable. Don’t go too fast: the goal of this step is to either pull out or break up the clog with the snake’s motion, not to soak everything within splash-range!

Step Four: Test the Toilet with a Flush

When the cable has retracted fully you should have successfully removed the clog. You’ll notice the water level going back to normal in the bowl. To really confirm it, take a test flush. If your toilet flushes without a problem and drains like normal then it’s official!

Step Five: Clean-Up

After you’ve confirmed that the toilet is back to normal, clean your toilet snake and safely store it away. We recommend cleaning your toilet snake with a hard-wire brush and warm, flowing water.

And in five easy steps, you’ve successfully resolved your blocked drain issues all on your own! Who needs a plumber with you around?

Preventative Measures Against Clogging

Now that you have solved the problem, you don’t want to have it again. There are a few ways you can stop another clog from happening in the future:

many toilet photos of clog repairing a toilet

The Flush

Only flush things that are meant to be flushed. For instance, we all know that toilet paper is specifically made to break down when you flush it down the toilet. But other bathroom items like cleaning wipes, sanitary products, and paper towels break down very slowly or not at all. These ‘unflushables’ should be thrown in a waste bin instead.

Take Cover

Another way to prevent clogs is the positioning of the toilet seat and cover. Any foreign object that falls into the toilet can easily lead to blockages. To avoid this, always keep your toilet seat and cover down to cover the drain. This not only stops things from falling into the toilet but is also more hygienic.

Drain Cleaners

Another clog-causing culprit is chemical drain cleaners. Over time certain chemical cleaners can build up in your drain and damage the bowl and pipes. Try avoiding these harmful products and instead look for cleaners marked as fully safe for your toilet and drain instead. Many of these options are not only safer for your toilet but also your home, your children, and the environment.

Eyes Open

Identifying and resolving any toilet issues early on can save you a world of trouble. If you notice that your toilet has trouble flushing or the water level is lower than normal, something could be wrong. If you can identify the problem early on you may not even need to use your snake! A plunger or a safe chemical solution could be enough to nip the problem in the bud.

Care

Finally, the most important way to keep your toilet clog-free is through regular maintenance and TLC. Keeping both your toilet and the pipes clean minimizes the risk of material build up over time. We recommend that you clean your entire system at least once or twice a month for the best results.

Buying a Toilet Snake

Toilet snakes are a very common tool and you can find them in most hardware shops or online. They’re also pretty affordable so it’s easy to have a basic toilet snake around for when you need it. Remember the snake/auger confusion? Well toilet snakes also go by ‘toilet augers’ or ‘closet snakes’ which can get confusing. The most important thing to look out for when buying though is a sturdy rubber coating because an exposed metal shaft can damage your toilet. So no matter the alias, you know enough about drain snakes now to make a good choice for your toilet.

Final Thoughts

So successfully snaking a toilet isn’t as tough as it sounds. After your first time you’ll easily snake any future stubborn clogs and avoid calling a plumber for an issue you can resolve all on your own. Remember our preventative measures and you’ll be unstoppable!

How to Install a Toilet Guide

installing a toilet

Most think that installing your own toilet is difficult, right? Wrong!

We have created an easy to follow  step-by-step process  that will guide you from start to finish of installing your next toilet.

Toilet Installation Process (Easy Step-by-Step)

All you need is:

Before you start:

installing a toilet

Take Measurements

As you shop for a new toilet, there are a few  important measurements  to take into consideration. Don’t risk buying a new toilet that won’t fit in your bathroom.

picture displaying toilet dimensions and measurements in white bathroom Here are 4 main measurements you’ll want to be sure of before purchasing your new toilet:

1. Rough-In

Make sure you know the rough-in measurement of your old toilet unit. In most cases, the waste pipe measures roughly 12-inches from the wall, but some can measure between 10 and 14-inches.

If you select a toilet whose rough-in doesn’t match the size in your bathroom, the pipes won’t match up and you won’t be able to install the new toilet.

2. Toilet Dimensions

Beyond the rough-in, you’ll want to measure all the key specs for your old toilet. Be sure to measure from the wall and not the baseboard. Keep in mind any water supply lines as well.

Particularly for toilets with a broader base, it’ll be helpful to confirm how much room you have besides the water supply line on the floor to make sure the new toilet will fit.

3. Space Around the Toilet

Another factor to consider is the available space for the toilet within your bathroom. We recommend that you measure from the bowl to the wall or any other appliances on either side of the toilet, to make sure the toilet will fit in the available space.

4. Toilet Bowl Shape

You’ll also want to pay attention to the shape of the bowl of your new toilet. Most toilet bowls are elongated for the sake of comfort.

However, if you are limited on space, consider going for a round bowl, which takes up less room and will be more likely to fit in a smaller space.

Tools and Preparation

toilet tools needed for an install, plumber with wrench Be prepared with the  necessary equipment before you start the job . You’ll want to gather all of your tools from the beginning. These tools include:

  • Locking Pliers
  • Slip joint pliers
  • 4-in-1 Screwdriver
  • Cordless drill
  • Adjustable wrench
  • Caulk gun
  • Level
  • Tape measure
  • Utility knife
  • Rags
  • Shop vacuum
  • Hacksaw

Besides these tools, you will also need some other materials. Some of these may come with your new toilet, but either way, it’s helpful to gather these materials before beginning the installation process.

Don’t forget, otherwise you may have to stop midway through installation to go to the store for additional parts. The additional materials you may need include:

  • Toilet flange
  • Brass toilet bolts
  • Wax ring or foam gasket
  • Silicone caulk
  • Plastic toilet shims
  • Access to water

With these materials in place, let’s now embark on the installation. There are two major steps for this process – removing the old toilet and then installing the new one.

Removing Old Toilet (Easy Steps)

Download the PDF version of the removal step-by-step guide.

The first step after buying a new toilet is removing the old one. As a whole unit, including the tank and the bowl, a toilet can be pretty heavy. 

Therefore, if you have a two-piece toilet, you can make your work easier by removing the tank first and then removing the bowl. If your toilet is a one-piece model, however, you’ll likely want to get help from someone else as one-piece toilets can weigh 80 lbs or more.  Heavy lifting?  I would say so!

hands removing and lifting a toilet from floor, 7 collage of photos showing removal steps

STEP ONE: Drain Water

Start by turning off the water supply line to the toilet. You should be able to turn the supply line on and off using a valve on the line itself. Once you’ve cut the water supply, flush the toilet, which will remove any leftover water in the tank. For any residual water, use a sponge to completely dry around the toilet.

STEP TWO: Lift Off Toilet Tank

Once you have disconnected the water supply line, place a bucket on the floor to catch any water that may be remaining in the pipes or bowl. Then, unscrew the nuts located on the bottom of the tank. At this point, you should be able to lift the tank off completely.

Since the tank is at great risk of cracking, always wear gloves as a safety precaution. It can also be helpful to lay out a towel, otherwise have a place ready to set down the old tank once it’s been removed.

STEP THREE: Uninstall Bowl

For this step, dry any excess water, loosen and remove the nuts that secure the toilet bowl to the floor. You can then carefully lift the bowl and remove it from the space. It’s also important to note that if you have a one-piece toilet, you’ll need to do steps 2 and 3 together, as the tank and bowl cannot be separated.

STEP FOUR: Remove Old Wax Ring

Since wax rings are not designed for reuse, you will have to remove the old one from the previous toilet. To remove the wax ring, use a putty knife, then start scraping off the old wax. After the scraping, take a rag and stuff it into the open hole to block sewer gasses and prevent objects from falling into the drain.

STEP FIVE: Check Flange

checking a toilet flange

Finally, once you’ve removed all the parts from the old toilet, the last step is to check the flange. This step is also for when you repair or replace the flange if needed.

NOTE: To repair the flange, start by removing the old closet bolts from the flange. Then, make any necessary repairs to the flange itself. You can often find repair kits at your local hardware store to help fix your broken flange. Alternatively, if you need to replace the flange completely, you can buy a replacement part to fit inside the pipe and create a tight seal once again.

Good on you, you’re halfway there! Now let’s move on to installing your brand new throne!

Install Your New Toilet (Easy Steps)

Download the PDF version of the installation step-by-step guide.

With your old toilet cleared and space available in your bathroom, you can now install your new toilet in no time in these easy to follow steps.

installation of a toilet, 6 photos, toilet parts, wax ring, plumber tightening tank bolts

STEP ONE: Install New Bolts

To install the new closet bolts, simply slide them into the slots on the flange. You must use washers or nuts to hold the bolts securely on the flange. Tightening these washers will make it easy for you to align your toilet as you set it in place.

If the bolts are rusted, please try the steps outlined in our rusted bolt removal guide here (link to guide)

STEP TWO: Apply New Wax Ring

wax seal installation for installing a new toilet

Next, you’ll want to install the new wax ring on the base of the toilet bowl. Start by placing the new bowl upside down on a towel, so you can easily access the base. Then, run the wax ring under warm water to soften it. Once softened, gently press the wax onto the base of the toilet bowl.

STEP THREE: Install Toilet Bowl

Once the wax ring is set, you can now remove the rag that’s been blocking the drain. Then, carefully lower the toilet bowl over the new bolts. Make sure to lower the bowl straight down over the flange, slowly rocking it in place. It’s important to be slow and careful at this point to avoid causing any damage to the wax ring.

Lastly, once you have the bowl in place, press down firmly down on the bowl, ensuring that it is square with the wall.

STEP FOUR: Secure Toilet Bowl

As the next step, add the cap bases, nuts, and washers to the closet bowls. Ensure that the right side of the cap bases faces up. It’s also a good idea to alternate tightening the nuts so you keep the pressure even across all points.  However, be careful to not tighten the nuts excessively as the bowl can easily crack. Once you have everything tightened, you can use a hacksaw to cut off the excess bolt.

STEP FIVE: Get Tank Ready

Once the toilet bowl has been secured, the next step is installing the tank. You’ll want to start by flipping over the tank so you can install the bolts that will secure it to the bowl. Ideally, the bolts ought to slip into slots located on the tank. After installing these bolts, you’ll then install the rubber gasket to the tank’s base.

STEP SIX: Securing Tank In Place

Now, set the tank in place on the bowl while hand-tightening the nuts on the bowl. Once again, be careful not to over-tighten them while still ensuring that the tank is level. If the toilet you’re installing is a one-piece toilet, you won’t need to worry about this step or the previous step, because the tank and bowl are already connected.

STEP SEVEN: Reconnect Water Supply

With the full toilet now installed, it’s time to reconnect the water supply and double-check everything. Reverse the step you took previously to cut off the water supply. In most cases, you’ll be able to switch the water supply back on using a valve on the supply line that connects directly to the toilet.

STEP EIGHT: Check For Leaks

Once you connect the water supply and turn on the water, you’ll want to check for any leaks around the gasket base and supply line. If you spot any leaks, the bolts are likely too loose, so you’ll want to tighten them some more.

If you’ve tightened all the bolts and you notice parts are still leaking, you may have to take the whole tank off and check that the gasket has been installed correctly.

You should also flush the toilet several times and check the area around the base for any leaks. If there is a leak, you may need to install a new wax ring to ensure everything is fully sealed.

STEP NINE: Install The Seat

Lastly, after confirming there are no leaks or other issues, the last step is to install the toilet seat. Most seats should come with basic, straightforward installation instructions. Typically, you’ll only need a screwdriver to install the toilet seat. Then, your new toilet is ready to go!

Congratulations!

You’ve saved yourself toilets of cash and you’re now DIY royalty!

What are you going to do with all your cash? Stock up on some rolls, take your special someone out for dinner or get that new gear – whatever you do with it, know that you did it yourself. Well done!

Our Final Words

As you can tell from our easy to follow step-by-step guide, it’s easy to replace your toilet with a brand new one! You should now know everything you need to about replacing and installing your new toilet. We hope you take it on and join the royal line of DIY toilet installers, trust us, the feeling is well worth it!

Good Luck and get in touch if you need any guidance, or even for a trumpet call halfway through. We will get you back on track in no time!

Fix a Toilet Leaking from Base (Simple Fixes)

toilet leak illustration

A toilet leak, while not necessarily an urgent issue, can certainly be annoying. Nobody wants to encounter wet floors in the bathroom, not to mention that leaking water can increase your water bill over time. However, don’t worry if you’re facing a leaky toilet in your home. The good news is that you can take care of the problem yourself!

Before we go into how to fix a leaky toilet, let’s start with the most common reasons why your toilets leak.

Reasons Why Your Toilet May Be Leaking at the Base

Here are the 3 most common reasons for a toilet leaking at the base:

4 photos showing water leaking from base reasons, wax seal with hand, hand with bolts

1. Loose Tee Bolts

loose-tee-bolts

Did you know that your toilet is actually secured to the ground in your bathroom with two bolts known as tee bolts?

Usually, these bolts help keep your toilet base securely sealed and attached to the floor. However, sometimes the bolts loosen over time, which causes a breach to the wax seal on your toilet base.


Without a secure seal, drain water is likely to seep out whenever you flush your toilet. You can usually tell if your tee bolts are loose by gently trying to rock the toilet. With fully secure tee bolts, your toilet shouldn’t move at all when you use it or try to move it.

2. Damaged Wax Ring

loose wax rings under a lifted up toilet

In general, if your toilet is leaking from the base, chances are that the wax ring is loose and needs replacement. While loose tee bolts can cause damage to the wax ring, it can also naturally wear down over time.

The wax ring keeps your toilet sealed, preventing any water from escaping, so damage to the ring allows water to leak out.

If your wax ring is damaged, you’ll want to install a brand new wax ring to re-seal the toilet and prevent any further leaking.

3. Loose Water Supply Line

For the above two issues, typically water will only leak from the base after you’ve flushed your toilet.

However, if you notice that water constantly leaks from your toilet base, it could be caused by a loose water supply line. To fix this issue, make sure the rubber and nut used to seal the connection for the water supply line is intact.

If these parts are faulty or loose, water could leak out through the connection point of the supply line, causing the constant leak.

How to Fix a Toilet That’s Leaking From the Base

As mentioned, while nobody wants a leaking toilet, thankfully solving this issue on your own isn’t hard. Start by gathering the below tools, and then follow our easy steps to identify and resolve all of your leaky toilet problems!

7 photos showing how to fix a leaking toilet base, tools, hands and fixes

1. Gather Your Tools

If you intend to fix the leakage on your own, here are some of the tools you’ll want to have on hand:

  • Adjustable Wrench
  • Caulk
  • Towel / drying cloth
  • Replacement wax ring (if needed)

After gathering these tools, you can start fixing your leaking toilet!

2. Look Out For Condensation

Before you embark on your toilet repair, you want to check your toilet bowl from the outside for signs of condensation. If you realize that your toilet is leaking due to condensation and not one of the issues listed above, the situation will be even easier to address.

To address the condensation, you can do some things like insulating your water tank or installing a tray to stop the leaking water from collecting at the base of your toilet. Either way, the water isn’t leaking directly from your toilet, which is good news.

In case condensation is not the issue, however, keep moving with these steps to identify what could be causing the leakage.

3. Tighten the Tee Bolts

To make sure your tee bolts aren’t the cause of the issue, you’ll want to check and tighten them. Depending on your toilet style, you may need to remove any plastic covers over the base of your toilet. Once you have access to the tee bolts, use an adjustable open-end wrench to tighten each bolt. By tightening the bolts, you’ll ensure that the wax ring sealing the toilet drain is compressed and doesn’t leak at all.

base of the toilet bolts

If you notice the tee bolts are already tight, however, they likely aren’t the cause of the issue. Don’t try to tighten bolts that are already tight or you may risk cracking the toilet itself. Instead, you’ll need to continue with the below steps by removing the toilet to install a new wax ring.

4. Detach the Toilet

For this step, start by turning off the water supply to the toilet. Usually the water shut-off valve is situated on the left side of the toilet next to the water supply tube.

Next, flush the toilet to drain all the water from the bowl. After flushing, you can use a towel or cloth to soak up any residual water in the bowl. Once fully emptied, use a screwdriver to remove the nut that holds the supply tube to fill the regulator tailpiece.

At this point, you want to use your wrench to get the nuts out of the tee bolts located at your toilet’s base. Once you’ve removed the tee bolts, you can lift away the toilet. If possible, get someone to help with lifting the toilet. If you have a two-piece toilet, you’ll actually remove the toilet tank and toilet base separately, which will be easier to do as one person.

5. Replace the Wax Ring

Now that you’ve detached the toilet, you’ll need to scrape away any wax surrounding the drain opening. Be sure to remove any wax from the old wax ring completely. After, get your new wax ring and install it by placing it on the plastic cone that faces down toward the drain.

As you install the new wax ring, make sure the tee bolts are correctly placed in the major openings on each side of the extension.

6. Reinstall the Toilet

Repairman hands installing flush toilet

Now, it’s time to reinstall your toilet. Take the toilet and carefully press it down onto the wax ring while rocking gently to compress the wax, creating a secure seal. Next, tighten the tee bolts using a wrench until secure. Be careful to not overtighten the bolts so you don’t damage the toilet base.

7. Reconnect the Water Line

Your toilet is now ready for use again! You can reconnect the water supply tube and turn the water back on, allowing the tank to fill. Once reconnected, flush the toilet to check for leakage. If your new wax seal resolved the issue, you shouldn’t experience any more leaking. Congrats! As a final step, use caulk for an additional seal on the base of the toilet, and you’re good to go.

How to Avoid Toilet Leaks

You may wonder what you can do to avoid similar toilet leaks in the future. While some causes of a leaking toilet occur due to natural wear over time, there are still a few recommendations for ways to avoid a leaking toilet.

Avoiding toilet leaks shown in 4 photosof toilets and repairs, red wrench

Avoid Flushing Unnecessary Objects Down the Toilet

As a rule, it’s best to avoid throwing items that don’t belong in the toilet into your toilet bowl. Including wet wipes and hair, avoid flushing any unnecessary items down your toilet. Otherwise, over time these objects will build up in your pipes instead of breaking down like natural waste or toilet paper. Ultimately, they may end up blocking your pipes which in turn may cause a leakage, so it’s best to avoid flushing anything that doesn’t belong in your toilet.

Do Not Unclog Your Toilet Using Chemical Drain Cleaners

If you do encounter a clog, it can be tempting to use chemical drain cleaners to remove the block. While chemical drain cleaners do their job well, they’re also extremely harsh on your toilet and pipes. Especially if you’ve used a chemical drain cleaner more than once, the chemicals can damage plumbing fixtures and pipes, causing leakages over time.

Fix Leaks Promptly

As soon as you realize that your toilet is leaking, you want to fix the issue as soon as possible. Waiting to fix the issue can lead to additional toilet problems, and also save on your water bill. Therefore, we recommend fixing issues quickly when they do arise to prevent larger problems down the line.

Bottom Line

As you can see, it’s not too hard to diagnose and fix a toilet leak. By following the steps outlined above, you can have your toilet functioning optimally again within a few hours. In the worst case, if the above steps don’t resolve the issue, we recommend hiring a professional plumber to help out. But for basic loose bolts or a wax ring replacement, we hope our guide helps you fix the issue quick and easily on your own.