We all know the sound a toilet makes when the toilet tank is running, right?
And maybe when you open the tank lid to take a look inside and you see all the fixtures, you don’t know which is which?
Take a look at the very bottom of the tank – there you will find the toilet flapper.
If you notice water leaking into the bowl of the toilet from the tank, it may be time to replace your toilet flapper.
[ez_toc]
Key Takeaways
Page Contents
Rubber toilet flappers should be replaced every 3-5 years, while hard plastic flappers are fairly corrosion resistant.
A run down toilet flapper can cost you hundreds of extra dollars in water bills.
However, replacing a toilet flapper on your own is easy!
What is a Toilet Flapper?
The toilet flapper is the part of the toilet that keeps water flowing smoothly from your toilet tank and into your bowl after you flush.
You can identify the flapper as a round, rubber component at the bottom of your toilet tank with a chain attached.
When you pull on the chain, the flapper rises and exposes the flush valve seat, through which water leaves the tank and enters the bowl.
When to Replace a Flapper?
It is recommended that rubber toilet flappers be replaced every 3-5 years, and hard plastic ones every 10.
Over time flappers can erode, warp, crack, or harden, leaving you with a leaky toilet.
Due to these elements, the flapper can no longer create a closed seal that keeps your tank water from flowing into your toilet bowl after you have flushed. That is when you will hear that running sound. Your flapper valve is continuing to leak.
If left unchecked, a leaky toilet flapper can cost you hundreds of extra dollars in your water bills.
Pro Tip: If you use in-tank cleaning products, your flapper valve may erode faster due to the chemicals in these products.
Checking a Worn Out Toilet Flapper
Here is a tried and true, super-easy test for your toilet flapper.
Take your favorite shade of food coloring (we do suggest a darker color for easier visibility)
Put 4-5 drops in your toilet tank.
Take a break for half an hour, then come back and check the toilet bowl.
If there is food coloring in your toilet bowl, you’ve got a leaky valve.
How to Replace a Toilet Flapper
So, you have come to the conclusion that your valve is leaking. You have two choices.
Call a professional plumber to take care of it for you or keep reading and fix it yourself (saving yourself extra bucks.)
Grab yourself a pair of cleaning gloves if you like, but no other tools should be necessary for a toilet flapper replacement.
Fix Yourself (Easy Steps to Follow)
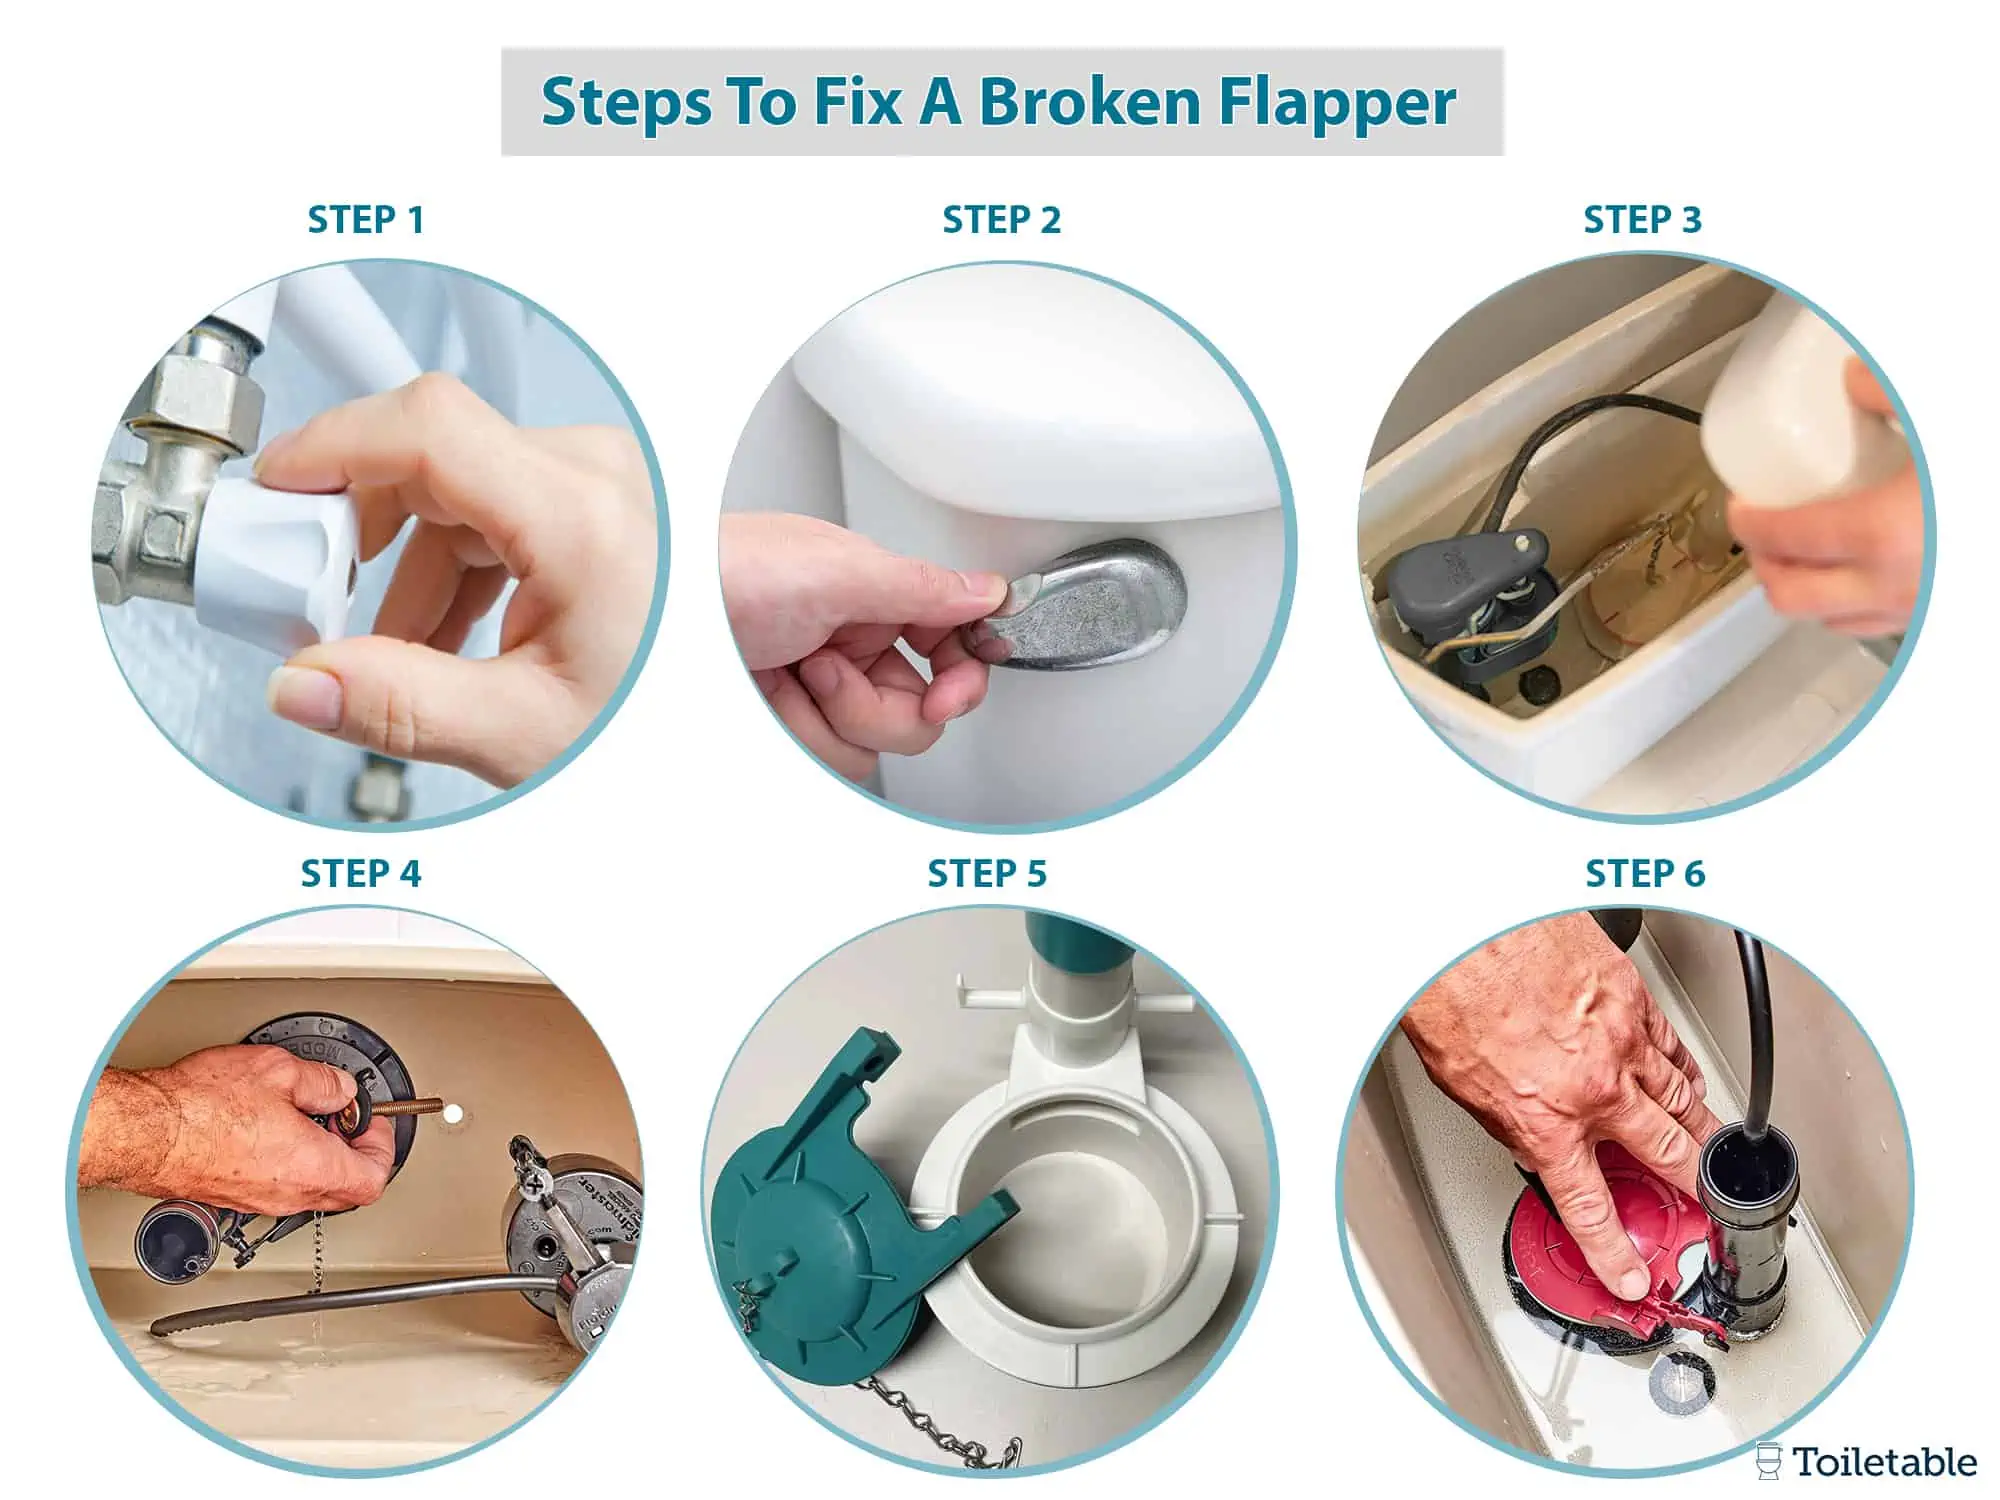
Turn off your water supply to your toilet.
Flush the water to drain your tank.
Unhook the chain connected to the flapper guide arm.
Remove the flapper by either unhooking the mounting arms or sliding it off the overflow tube. It will depend on your flapper’s design. Feel free to dispose of this part.
Install the new flapper by placing it at the bottom of the tank, making sure it is aligned correctly.
Rehook the hinges at the bottom and reconnect the chain to the flapper’s guide arm.
Test the flush handle to make sure the flapper rises properly.
Adjust the chain as necessary.
Easy as that! Only ten minutes of your day, and no extra cost to you.
Remember to turn your water back on!
If you still hear the toilet running, try adjusting the chain. If that still doesn’t work, call a trusted plumber to discuss the job.
Check for a Misaligned Toilet Flapper
Sometimes your flapper might not be worn out, just misaligned.
If there is no food coloring in your toilet bowl after the food coloring test, but you’re still hearing the running tank sound, your flapper may just be misaligned with the opening.
Give it a second look – the bulb should be aligned in the center of the flush valve seat, and the flange should fit snugly around the edge.
Try adjusting the flapper’s guide arm. If that doesn’t help, take the whole piece off and reinstall it.
Different Kinds of Plastic Flappers
Choosing the right toilet flapper for your toilet is imperative, but there are an awful lot of flappers to choose from.
The most popular type of toilet flappers are rubber, but we are here to give you much needed info on hard plastic flappers.
Adjustable Flappers with Floaters
Adjustable flappers with floaters are a great alternative to rubber flappers, and with the addition of the floater, you have better control of your flushing.
Based on how high or low you place the floater, it adjusts the level of water in your tank.
Set Disk Flappers
The older model of flappers, the set disk flappers connect to your tank water with a large disk without a chain. When you flush, a mechanism lifts the disk and allows water to flow into the bowl. When the water lessens enough, the disk falls back down.
This kind of flapper is not our favorite, and is becoming out of style with manufacturers. If you have the chance to replace yours, we recommend it.
Tank Ball Flappers
This flapper has a part called the ballcocks, plastic pieces that open and close the tube to the tank. When you flush, the pieces rise and open the outlet. When the water refills and makes the flapper heavy enough to seal again.
Are All Flappers Universal?
The short answer is: no.
When looking to buy a new or replacement toilet flapper, you must measure your current flapper first.
Flappers can range in size, so take a look and measure it with a ruler. The flapper must fit the dimensions of your specific toilet tank.
With that information on hand, you will be able to find the right toilet flapper for you at any local hardware store.
Choosing a Toilet Flapper
When buying a new toilet flapper, the most important thing to consider is the size. Toilet flappers used to be universal, but today, they usually range between 2 and 4 inches in size.
The size of the flapper is usually determined by a few factors: First, it depends on the date it was manufactured. While older flappers tend to be about 2 inches, newer models can be anywhere between 3 and 4 inches. Therefore, you may have a clue to which size you’ll need based on how old the previous flapper was from your toilet.
Another factor that can indicate the size of the flapper is the gallons-per-flush rate of the toilet. For example, newer toilets that have a flush rate between 1.28 and 1.6 gallons usually have 3-inch flappers. In general, if you have a newer toilet, you’ll likely need a larger flapper.
Measuring Flapper Size
So what if you can’t figure out the flapper size based on the toilet’s age or flush efficiency? To start, if you know the model of your toilet, you may still be able to find the information without having to physically measure anything within your toilet.
Instead, you can usually find the flapper size online. If you are not sure about the model of your toilet, check inside the tank for the model number, and then search online.
Alternatively, if you’d prefer to directly measure the flapper, you can confirm the flapper size by measuring the inside drain diameter within your toilet. If the inside drain is less than 2.5 inches, you have a 2-inch flapper. If it’s around 3 inches, you have a 3-inch flapper, and if it’s over 3.5 inches, your flapper size is 4 inches.
Final Thoughts
Leaking flappers can result in a lot of wasted water, which is both expensive and terrible for the environment. Thankfully, replacing a broken flapper is a quick, easy, and affordable process. By following this guide, we hope you’ll easily avoid any issues from a broken flapper in the future.